Search Results
2006 results found with an empty search
- Quick Mess Cheese Pie
## Effortless Delight: Quick Mess Cheese Pie Recipe Quick Mess Cheese Pie Today, I decided to prepare a traditional Serbian dish known as Gibanica, a type of cheese pie. This recipe was passed down from my grandmother, who frequently made it for my mother. It is remarkably quick and easy to prepare and bake. The ingredients required are thin pie crusts, cow's crumble cheese or Greek feta cheese, sour milk, yogurt or kefir, four eggs, oil, sour water, baking powder, and a pinch of salt. This appetizer is perfect for a snack meal, dinner, or breakfast, offering a delicious and juicy flavor. I highly recommend trying this recipe. Follow recipe. Quick Mess Cheese Pie Ingredients : simple,total time:40 min. 8 portions 500 g thin crust for pie 500 g Greek feta cheese/ or cow crumble cheese - mashed 3 eggs 1/2 tsp salt/ or to taste 200 ml yogurt 200 ml sour milk 5 g baking powder 150 ml mineral water 100 ml seed oil and more : little seed oil for spread 50 ml milk 1 egg Quick Mess Cheese Pie Preparation : In a deep bowl, mash the cheese, add the 3 eggs, salt to taste, mix again briefly with a wire whisk. Quickly add yogurt, sour milk and mix again to combine. Then add oil, mineral water and mix well, baking powder l untill uniform. Turn on the oven to 200°C. Grease a 23 x 38 cm baking pan as well as edges. with a brush. Place two crusts on the bottom of the pan so that one part of the crust is outside the pan. Set aside one crust for the top of the pie. Dip the remaining crusts one by one in the egg and cheese mixture, arrange them on the bottom, one next to the other. Pour the rest of the mixture over them, add the last crust and tuck in with a knife or fork, then fold the sides of the crusts on both sides. Coat the entire surface of the crust with 50 ml of oil using a brush. Beat one egg and milk and brush over, spreading over the entire surface. Press the crusts lightly over the entire surface with a spoon. Then place in the oven on the lower level of the oven to bake for about 30- 35 minutes, until the crusts are golden brown. Cover the finished pie with a clean cloth and let it cool for about 15 minutes, then cut into portions and serve with yogurt or sour milk or kefir. Buon appetito! Quick Mess Cheese Pie NOTE: You can also use thicker pie crusts instead of thin crusts. You can combine spinach or other greens to these ingredients. If you like bacon, you can fry it first and add it to the ingredients. Keep the rest of this pie covered in a cool place for up to 3 days. Heat in a pan or microwave. Do you want to try something a little different? Cheese Pie- Gibanica Cheese Pie recipe, the best recipe Gibanica Salty Cheese Pie Gibanica Serbian Traditional Pie Lena Decorative Cheese pies Popay Pie Quick Mess Cheese Pie #quick #mess #cheese #pie #appetizer #gibanica #breakfast #dinner #simple #recipe #food #delicious #serbianfood #traditiinalfood Use the contact form for questions or advice. I would be happy if you would comment on my recipes and put like.
- Soft Banana cookie's
### Irresistibly Soft Banana Cookies: A Delicious Treat Soft Banana cookie's Delight in the exquisite and tender banana-flavored cookies or banana gingerbread because it really resembles them that can be prepared swiftly after a day at work. Enhance the cookie dough with additions such as corn flakes or chocolate chips. These treats serve as an ideal dessert for any occasion. The preparation process is straightforward and efficient. Simply follow the recipe. Soft Banana cookie's Ingredients : simple,total time:50 min, 16-17 cookies 1 egg 60-70 g of granulated sugar 1 bag of vanilla sugar/ 10 g 100 ml sunflower oil 1/2 grated orange zest 2 bananas/ mashed a pinch of salt 350 g flour 8 g of baking powder 60 ml of orange јuice 150 g melted chocolate+ 2 Tbsp oil for dipping Soft Banana cookie's Preparation : Mix all the ingredients from the description. The mixture should be like dough for dumplings. Once you have mixed the dough, line a baking tray with baking paper and turn on the oven to 170°C. Scoop out the dough with a spoon and shape into a circle on a baking paper in oven tray, the shape doesn't matter. When you're finished arranging, bake at 170°C for about 35-40 minutes. 15 minutes before the end of baking, melt the chocolate over steam or in the microwave, add oil and a little milk. Leave the finished cookie's to cool for a few minutes, then roll the cookies in chocolate in half, place them on paper to cool completely. Serve when completely cooled. Buon appetito! Soft Banana cookie's NOTE; Instead of flour, you can use almond flour, rice flour, or ground oats. If you want it to be a little crunchy and crunchy biscuits, you can add about 60 g of chopped corn flakes. You can add about 50 g of chocolate drops to the cookie mixture. Instead of sugar, you can add honey, maple syrup, or stevia. Do you want to try something a little different? Linzer Cookies Simple Cookies Margarita Cookies Simple Cookies Simple Puff Cookies Gurabie with Jam Coconut Buns Lena #soft #banana #cookies #simple #recipe #delicious #easy #baking #dessert #biscuits #baking #oven #food #delicious #homemade Use the contact form for questions or advice. I would be happy if you would comment on my recipes and put like. Store the cookies in a cool place, in an airtight container, for up to 3 days.
- Baked Vegetables with Pork Ribs and Couscous
## Savory Baked Vegetables with Pork Ribs and Couscous Baked Vegetables with Pork Ribs and Couscous This recipe is remarkably simple, yet incredibly delicious and quick to prepare. It can aptly be described as a "Serbian pot on the go." The dish incorporates a variety of ingredients, resulting in a rich and flavorful meal. In addition to ribs, you may use pork or beef steaks, or alternatively, chicken drumsticks and thighs. The preparation is swift, with a baking time of approximately 2 hours. This meal is perfect for a delightful Sunday family lunch. Please follow the recipe. Baked Vegetables with Pork Ribs and Couscous Ingredients : simple, total time: 135 min. 6 servings Vegetables and meat: 1.2 kg pork Ribs/ or beef steaks, or chicken meat( small drumsticks or thigs), veal or pork steaks 2 long green peppers/ or yellow, cut into pieces 2 long red peppers/ cut into pieces 5 medium potatoes/ diced 3 medium carrots/ or small carrots 2. package 400 g 2 medium onions/ cut into ribs or quarters 6 large button mushrooms/ halved or 150 g sliced - optional Olive oli EVO to taste salt and pepper to taste 1 Tbsp + 1 tsp red ground pepper - allspice for ribs- divided 2 Tbsp tomato paste/ or paprika paste +100 ml 1 tsp oregano or to taste 100 ml water/ or as needed baking dish 24 x 40 cm or deep terracotta dish For Couscous as you like: 1 cup Couscous/ 240 ml salt to taste 1 tsp dry spice Vegeta 1 cup of hot boiling water/ 240 ml Baked Vegetables with Pork Ribs and Couscous Preparations : Preparation meat and Vegeteables: Wash and clean all vegetables well, then cut them as described in the recipe. If using small carrots, leave them in pieces. Wash larger mushrooms with stems and cut in half. Place the vegetables and mushrooms in a deep and greased baking dishes. Now add all the spices: salt, pepper, Vegeta dry seasoning, red ground paprika, oregano, and paprika paste (or tomato paste mixed with 100 ml water), pour olive oil to taste over - mix with the ingredients well from all sides. Cut the meat into thicker steaks about 7 mm. Season on all sides to taste (salt, black, pepper, and dry spice Vegeta). If you chose ribs in the whole piece, like I did, then first oil them, season with salt, black pepper, add Vegeta dry seasoning and red ground pepper - spread over the entire surface as well as on the other side. Place over the vegetables. If you are placing steaks, then arrange one row of vegetables, then another row of two- three steaks, and repeat until you have used up all the material. I used a transparent baking dish 24 x 40 cm, you can use a deep terracotta pan if you have, it's important that it's deeper and slightly wider. Cover the dish with lid or with aluminum foil, bake in a preheated oven at 180°C, about 120- 125 minute's. NOTE : After 60 minutes of baking, remove the aluminum foil - stir the vegetables, return and bake for about 20 minutes. If it is necessary to add a little water, the vegetables will certainly release their juices during roasting. During roasting, turn the meat and stir the vegetables every 20-25 minutes three times, until the vegetables and meat are tender and browned. Preparation of Couscous: Prepare the couscous, 15 minutes before the end of baking. Pour one cup of couscous into a saucepan, add salt and dried herbs, stir, then pour boiling water over, and let stand for 5-7 minutes, covered. Serve roasted vegetables and meat with a side of couscous. Buon appetito! Baked Vegetables with Pork Ribs and Couscous NOTE: You can combine other vegetables like: eggplant, zucchini, or other vegetables as you like. You can fry the mushrooms separately in a little oil with the addition of pepper and salt to taste. Instead of couscous, you can use rice or polenta . See the recipe on the my website. Keep leftovers in the refrigerator for up to 3 days. Reheat in a pan or microwave or oven. Baked Vegetables with Pork Ribs and Couscous Do you want to try something a little different? Baked Hake my way Karadjordje Schnitzel baked in Oven Baked Chicken in Sour Cream Baked Gourmet Sarma roll in Oven Pork Shank with baked Potatoes and Sauerkraut Roasted Chicken in a Beer Baked Vegetables with Pork Ribs and Couscous #baked #vegetables #with #pork #ribs #beef #veal #chicken #steaks #meat #couscous #baking #oven #easy #simple #delicious #food #lunch #meal #maindishes #rice Use the contact form for questions or advice. I would be happy if you would comment on my recipes and put like.
- Pepper - Beef meat with Onion
## Spicy Pepper Beef with Onion Delight Pepper - Beef meat with Onion Beef in pepper sauce according to my recipe. very similar and delicious which goes fantastically with lightly cooked white rice, served with soy sauce. You can use meat from beef pulp or a thicker steak which you will cut into thinner fillets, then cut into pieces. In addition to the meat, you will need two large beans, one red and one green, soy sauce, oyster sauce or teryaki sauce, and one large onion. You probably have the other spices at home. Rice goes well with this dish, but you can also combine it with chicken or boiled potatoes. Preparing this dish is quick and easy, it is similar to a Chinese meal only with fewer ingredients but gives the perfect taste and satiety! I consume it without bread and you can do it however you want. Follow recipe. Pepper - Beef meat with Onion Ingredients : simple, total time: 75 min., 4 werving For Marinade: 700 g beef sirloin/ or pulp or flank steak, thinly sliced cut in piece's 2. 5 Tbsp soy sauce 1 Tbsp oyster sauce/ or teriyaki 1 full Tbsp cornstarch 1/2 tsp sugar Other ingredients : 4 Tbsp oil/ divided 1 green bell pepper/ sliced on strips 1 red bell pepper/ sliced on strips 1 large onion/ sliced- cut into ribs 2 large cloves garlic/ minced 1/2 tsp ground ginger/ or fresh ginger 300 ml ml beef broth or water sesame seeds as desired Pepper - Beef meat with Onion Preparation : Preparing the marinade and meat : Wash the meat, dry it well, and clean it from the veins, cut it into thin fillets about 3-4 mm, then cut them into pieces as desired. Transfer the sliced meat to a deep bowl. Marinate and stir beef sliced meat with soy sauce, oyster sauce( or teriyaki), cornstarch, and sugar for 15-20 minutes. NOTE : If you want rice with this dish, then prepare right after the marinade is very simple, it according to this recipe. Preparing vegetables: During this time, cut the onion into ribs, wash and clean the peppers from seeds and stems, then cut them into strips. Set aside. Heat the oil over moderate heat. Stir and fry beef quickly until just browned on both sides, mix occasionally. Remove with sauce and set aside. In a same pan, drizzle oil again add onion, simmer about 5-7 minutes, then add peppers. Stir-and fry 5-7 minutes, covered. Add minced garlic and ginger powder, stir well about minut. When the garlic has released its aroma, return the meat with the sauce, mix and pour the broth over it. Stir-fry until sauce thickens and coats everything, about 20-25 minutes, uncovered. Towards the end, if you want, you can add sesame seeds. Serve hot with steamed rice with soy sauce. Buon appetito! Pepper - Beef meat with Onion NOTE: In this recipe, I used beef pulp and cleaned the veins. Instead of broth, you can add water, but with the Vegeta dry seasoning, add salt and pepper to taste. Keep the rest of the food covered in the refrigerator for up to 3 days. Pepper - Beef meat with Onion Do you want to try something a little different? Rice in the Serbian Way Chinese-style Risotto with Chicken and Peas Chinese Fried Chicken Light Chinese Rice with Vegetables Chinese Beef with Bamboo and Mushrooms Pepper - Beef meat with Onion #pepper #beef #meat #onion #delicious #recipe #peppers #soysauce #oystersauce #teryakisauce #food #lunch #meal #dinner #easycooking #simple #sauce #broth Use the contact form for questions or advice. I would be happy if you would comment on my recipes and put like.
- Semolina Homemade Dumplings
## Deliciously Easy Semolina Homemade Dumplings Semolina Homemade Dumplings Delightful homemade semolina dumplings are ideal for enhancing the flavor of stews and soups. These dumplings are exceptionally tasty and tender. They are quick and easy to prepare, requiring only four ingredients. Follow the recipe for optimal results. Ingredients: simple, total time: 15 min. 2 eggs 2 pinches of salt 2 tsp of oil/ or 1 Tbsp melted butter 10 flatTbsp of semolina / divided 8+2 Tbsp flat tsp dry parsley/ as you like optional Semolina Homemade Dumplings Preparation :simple, total time: 15 min. In a deep, medim-sized bowl, beat stiff egg whites and a pinch of salt. Add the egg yolks one by one and mix well. Then pour the oil and gradually add 8 spoons of semolina. When it is as thick as a thick pudding, add 2 more spoons of semolina and pinch of salt, stir. Leave the mixture for 20 minutes to swell. When the soup boils, recuce heat dip a teaspoon, form a dumpling with another teaspoon Into it and scoop up the dumpling mixture. If you want a bigger dumpling you can work with a bigger spoon, but don't overfill it, so that the dumplings are not too big and fall apart. From the last dumpling added, cook for another 10 minutes to low heat. Turn off the heat. Buon appetito! Semolina Homemade Dumplings Here is another recipe that is more economic! 2. SEMOLINA DUMPLINGS: INGREDIENTS ; 1 whole egg 4 Tbsps of olive oil 8 Tbsp of semolina a little salt Preparation; Beat the egg well with a fork, add 4 spoons of oil and salt to taste, beat well. Important: use the same dry soup spoon with which you put the oil! That's a measure, how much oil can fit in a spoon, so put semolina, it means 8 level spoons. Stir and wait a minute - two may seem rare to you, but you don't need to wait just a little bit. Bring to a boil in the soup, the soup should not boil very much, but let it bubble gently, put small cloves in because they grow a lot! Use a teaspoon for boiling. Cook for about 5 minutes, turn off the stove, cover and when they thicken, they are ready! Garnish the soup with finely chopped parsley. NOTE : When making the dumplings, make sure that the dough is not too hard but soft, evaluate when adding semolina. You can cook them in a separate pot and only then add them to soups on a plate. In order for your dumplings to last longer, use as much of the mixture as you need and put the rest covered in the refrigerator and use the rest until tomorrow. Do you want to try something a little different? Asian Soup Dumplings Dumplings of Semolina Perfect Soup Dumplings Asian Dumplings Gyoza All about Dumplings Serbian Paprikash Stew with Chicken Meat and Dumplings #semolina #homemade #dumplings #simple #easyrecipes #eggs #oil #parsley #soup #stew #food #recipe #food Use the contact form for questions or advice. I would be happy if you would comment on my recipes and put like.
- Serbian-Leskovac meat Dumplings from the Oven with Frenchfries
## Leskovac Dumplings with Oven-Baked French Fries Serbian-Leskovac meat dumplings from the Oven with Frenchfries Traditional Serbian Leskovac dumplings are a delightful choice for those who appreciate gourmet cuisine. They can be prepared at any time, making them perfect for holidays and Orthodox celebrations. The preparation process is straightforward and quick, and they can even be made a day in advance. The recipe requires only a few ingredients, with the main ones being minced meat, melted hard cheese, bacon, and an egg, complemented by various spices. I also prepared French fries to accompany this dish, which pair excellently with barbecue. You will learn how to achieve fries that are crispy on the outside and soft on the inside. Follow the recipe for best results. Serbian-Leskovac meat dumplings from the Oven with Frenchfries Ingredients : simple,total time: 80 min., 12 meat dumplings 500 g minced meat/ pork, beef 1/2 tsp salt 1 tsp ground hot pepper 1/2 tsp black pepper 2 large cloves of garlic/ minced 2 flat tsp ground sweet paprika 100 g bacon/ diced on small cubes 1 medium egg 150 g Gouda cheese/ diced on small cubes 1 tsp dry parsley as you like Little oil for spread oven tray and dumplings Potatoes : 6 potatoes/ cut in sticks 3 full Tbsp flour 1 full Tbsp cornstarch 1 tsp salt 1 tsp baking soda water as needed Oil for frying Serbian-Leskovac meat dumplings from the Oven with Frenchfries Preparation : First, prepare all the ingredients as described above. Dumplings : Place the minced meat in a deep bowl, add all the spices from the description, diced bacon, diced cheese, 1 egg and dry parsley, mix it all well, about 10 minutes, until well combined. When everything is connected properly, transfer it in the fridge for 20 minutes to rest, covered. During this time, line the oven tray or baking dish with baking paper and preheat the oven to 200°. Now prepare potatoes. Potatoes ; Peel the potatoes well, clean them of impurities, then cut them into sticks, rinse them again and place them in a deep bowl. Pour enough water to cover all potatoes, add salt and baking soda, mix well, let it stand 20 min. After the elapsed time, strain the potatoes, dry them well with kitchen paper or clean kitchen towel. Roll them in a mixture of flour and cornstarch. Shake off excess flour and place them in a colander. Repeat this with the other half. When you get to half of the potatoes, shake them a little with a strainer and immediately place them in the hot oil to fry until golden brown. Repeat this with the other half. You do this when you have already put the meat dumplings in to bake! Final work: Form meat dumplings and arrange them on baking paper. Form them so that they are the size of a tennis ball, then use your palm to make a small roll, then shape them into an oval. Press the dumplings lightly with your palm or fork. Coat all dumplings with a brush and bake at 200°, until golden brown, about 35-40 min. During baking, after 15-20 minute's turn to the other side to brown evenly, and continue baking for another 15-20 minutes, depends of the oven. Serve warm as soon as it is done. Buon appetito! Serbian-Leskovac meat dumplings from the Oven with Frenchfries NOTE: Keep leftovers covered in the refrigerator for up to 2 days, reheat in a pan or microwave. Serbian-Leskovac meat dumplings from the Oven with Frenchfries Do you want to try something a little different? Gourmet Serbian Burger Chicken Burgers Keftedes Greek Burgers Gourmet Serbian Burger Recipe Leskovac Meat Donuts #leskovac #dumplings #frenchfries #maindishes #lunch #meal #delicious #food #simple #recipe #mincedmeat #pork #beef #cheese #bacon #serbianfood #traditionalfood #easybaking Use the contact form for questions or advice. I would be happy if you would comment on my recipes and put like.
- Simple Cookies
Simple Cookies Delicious fragrant cookies made of semolina and coconut with chocolate drops. They are easy to prepare and are ready quickly, only a few minutes you will have a nice dessert. Phenomenally soft and delicious, really pleasure. Follow recipe. Ingredients : very easy, total time 40 min, 10 persons 250 g of wheat semolina 150 g coconut flour 8 g baking powder 1 sachet vanilla sugar pinch of salt 2 eggs 120 g sugar 100 ml seed oil 1 orange juice and 1/2 orange peel / or 1 lemon juice and 1 lemon peel 70 g drops of chocolate 30 g coconut flour + 30 g semolina mixture in plate /For rolling cookies Simple Cookies Preparation: Mix the eggs with the sugar and vanilla sugar with a hand whisk until foamy, then gradually add the oil and orange juice. Stir again. Add grated peel of 1/2 orange and whisk. Then add semolina and coconut flour, baking powder, a little salt and whisk the dough well again with a spatula. When you get a compact dough, add the chocolate drops and mix well again. Leave the dough to rest for 10 minutes in the refrigerator. Mix coconut flour and semolina in one plate. Take out the dough with a spoon, make a ball and roll it into the mixture, then flatten it with your hands and make a round biscuit. Arrange them in a baking tray on baked paper. Bake them in preheated oven, 170 °C, 15–20 minutes. Allow to cool slightly, then serve. . Buon appetito! #simple #cookies #biscuits #soft #easy #recipe #homemade #coconut #food #dessert #biscuits Use the contact form for questions or advice. I would be happy if you would comment on my recipes and put like.
- Spring rolls with meat and Carrots
## Delicious Spring Rolls with Meat and Carrots Spring rolls with meat and Carrots I love spring rolls, whether with vegetables or meat. They are quick and easy to prepare. This is one of my favorite dishes at a Chinese restaurant as an appetizer. Luckily, we have Chinese shops here, so I am often a customer there once a month. What I like most about Chinese food is that it tastes good and you don't feel like your stomach is bloated. Today I'm going to make Chinese rolls with ground beef and carrots. These delicious rolls can be served as an appetizer or a main dish. Follow the recipe. Ingredients : simple, total time: 55 min. 10-12 serving 600 g ground beef 350 g carrots/ finely chopped 100 g Bihon - rice noodles - soaked in warm water 1 medium onion/ finely chopped 1 Tbsp cloves of garlic/ minced 2 Tbsp soy sauce 1 tsp ground black pepper salt to taste 20-33 pieces spring roll wrappers - 21 cm Spring rolls with meat and Carrots Preparation : Soak Bihon rice noodles in warm water. In a super chopper, chop the peeled and chopped carrots into small cubes. Heat a little oil in a pan and add the chopped onion. When it has softened, add the chopped carrots, mix well and stew for about 5-6 minutes. Add minced meat - mix well, season to taste: salt, pepper, add a minced garlic, and little soy sauce. Cover the pan and simmer more for about 3 minutes. Add drained Bihon noodle and mix everything well. Stew for another 10 - 15 minutes. Cool the filling completely. Prepare the spring rolls and pour 2 spoons of filling on each. Roll the spring roll half way, then tuck sides in like when making a letter, smear the edge with water and wrap it in a roll to the end. Set aside. Repeat until all material is used up. When you have finished all, heat the oil in a pan, fry the rolls until they are golden brown on all sides. You can also do this in the deep fryer. Put the finished rolls on a plate lined with kitchen paper to absorb excess fat. Serve warm with sweet and sour sauce. Buon appetito! NOTE: If you like spicy ingredients, you can add them to the filling, or use hot sauce for topping. Cover the remaining rolls and refrigerate for up to 2 days. Reheat in a frying pan or microwave. Do you want to try something a little different? Enriched Chinese Spring Rolls Spring rolls with Beef minced meat and Greens Original Crispy Vegetable Spring Rolls Spring Rolls Original Chinese Recipe #spring #rolls #springrolls #beef #mincedmeat #carrots #sidedish #appetizer #recipe #chinesefood #chineserecipe #delicious #deliciusfood #simple #easy Use the contact form for questions or advice. I would be happy if you would comment on my recipes and put like.
- Salčići Serbian desserts
## Discover the Delight of Salčići: A Serbian Dessert Treasure Salčići Serbian dessert Salčići are a traditional Serbian dessert that always takes us back to our precious childhood and the memory of how our grandmothers and mothers used to prepare them. They are very tasty and soft filled with apricot or plum jam. The preparation is simple, except that you have to wait for the dough to double. When the dough is ready, fold it (like a book) and coat it three times. If you have a dough mixer, it will go faster and easier. I love this dessert not only because it is a traditional dessert, but also because it always takes me back to my childhood when my mother used to prepare them for me. This dessert will take you patience, love and time, and children are the ones who enjoy this treat the most. They are ideal for all occasions, especially on the eve of Easter or Christmas. Follow the recipe. Ingredients : medium, total time: 140 min, 1 kg of flour 300 ml of water 4 egg yolks 250 ml of milk 2 Tbsp of sugar 1 cube of fresh yeast/ 42 g 1/2 tsp of salt 1 grated lemon peel 100 ml of oil a small glass of brandy/ 0,50 ml 500 g of pork lard/ minced Nutella cream or jam/ plum, apricots Powdered sugar for sprinkle Salčići Serbian dessert Preparation : Take a small saucepan and heat 100 ml of milk in it. When it is warm (we need lukewarm milk), add 1 teaspoon of granulated sugar, 1 spoon of flour and crumbled yeast, mix everything and leave for 15 minutes for the yeast to activate. Leave 3 spoons of flour on the side, you will need to combine it with the lard that you will use to coat the dough. Pour the rest of the flour into a larger and deeper bowl, add water, the remaining milk, activated yeast, egg yolk, grated lemon peel, the rest of the granulated sugar, oil, brandy and salt, knead the dough and leave it in a warm place until it doubles in size, about 60 minutes. Be sure to grind the lard in a meat grinder, add 3 spoons of flour, then combine everything. Transfer the risen dough to the work surface and thin it with a rolling pin to a thickness of 5 mm. Spread it with a third of the lard, then fold it into three equal parts. Fold the resulting strip three more times, into three equal parts, and let the dough rest for 30 minutes. Repeat the same procedure two more times - roll out the dough with a rolling pin, coat it with lard, fold it over, and let it rest. For the fourth time, roll out the dough with a rolling pin to a thickness of 1 cm, cut it into rectangles, spread it with cream or marmalade, and close the edges of the dough. Bake in a preheated oven at 200°C until golden brown, about 20- 25 minutes, depends of oven. While they are still warm, roll in the powdered sugar. Salčići are ready for consumption. Buon appetito! NOTE: Keep the remaining sauce at room temperature, covered with plastic wrap, for up to 7 days. Do you want to try something a little different? Dessert of Lard and Puff Pastry(Salčići), Serbian Dessert ù Salčići Traditional Serbian dessert Cinnamon Rolls Pumpkin Pie Roll Rolled Biscuits with Jam Apple and Cinnamon Rolls Giant Apple Cinnamon Roll #salcici #dessert #food #dough #jam #Nutella #serbiandessert #rolls #buns #easybaking #serbianfood #traditional #Christmas Use the contact form for questions or advice. I would be happy if you would comment on my recipes and put like.
- Popay Pie
##Discover the Delight of Popay Pie Popay Pie Puff pastry pie with spinach and ricotta filling is both delicious and simple to prepare, making it a dish you'll want to recreate repeatedly. In this recipe, I opted for fresh kale instead of spinach, which I cooked in boiling water for approximately 7 minutes. If you choose to use spinach, you can skip this step. Additionally, I incorporated button mushrooms, combining them with the kale. While puff pastry is recommended, you may also use homemade dough (see the recipe here or thin crusts for pies and cakes, depending on your preference. This recipe is excellent; let's prepare it together. Follow the recipe. Popay pie Ingredients : simple, total time: 80 min., 8 serving 200 g of fresh spinach/ or kale, spinach can be frozen - finely chopped 250 g of button mushrooms/ cut into leaves 200 g of ricotta cheese/ or tofu or other cheese 1/2 medium onion/ finely chopped 2 medium cloves of garlic/ minced 2 Tbsp of olive oil EVO 2 sheets puff pastry/ or yeast dough 1 tsp of salt 1/2 tsp black pepper 1/2 tsp nutmeg/ optional 1 tsp of dried oregano 1/2 cup of water/ or 130 ml liquid from boiled kale For Spread : 1 egg yolk + 30 ml milk Popay pie Preparation : Prepare all the ingredients as described above. First, prepare the filing of spinach or kale. Wash the spinach well if it is fresh and clean it of the excess stalk. If you are working with black cabbage - kale, wash them well under warm water, separate the leaves from the main stem, then remove the hard vein in the middle. Heat water with a little salt for black cabbage - kale. If you are working with spinach there is no need for it. As soon as it boils, put the cleaned leaves and cook until they become limp. When it has softened, turn off the heat and strain. Let it cool then chop it in small pieces Heat the olive oil in a pan over low medium heat. Add the finely chopped onion and fry until translucent, about 2-3 minutes. Add the mushrooms cut into thin leaves - fry them until they soften and all the liquid evaporates, about 7 minutes. Add minced garlic, when fragrant add fresh chopped spinach or kale, water (or liquid from boiled kale) fry about 10 - 15 minutes, until the spinach wilts, and the liquid evaporate. NOTE: Make sure that the liquid evaporates well from the ingredients so that the dough is not sticky! Season with salt, pepper and nutmeg, if using. Remove the pan from the heat and let the mixture cool. Now prepare the filling of ricotta. In a large bowl, mash the ricotta or other cheese with a fork until creamy, then mix it with the cooled vegetables. Sprinkle with oregano and season with salt and black pepper as needed, mix all ingredients well until combined. Place one sheet of puff pastry on the greased baking dish ( round or rectangle) and roll it out so that it covers the bottom and sides of the pan. (If you use yeast dough, you can simply roll it into the desired shape.) Spread the prepared filling with spinach, mushrooms and ricotta cheese evenly over the dough. Cover with the second part of the dough, and carefully press the edges with a fork so that they do not open during baking. Prick the top of the dough with a fork, then brush with a mixture of egg yolk and a little milk. Place the pie in a preheated oven at 180°C and bake for about 30-40 minutes, until it becomes golden brown and crispy on the surface. When Popeye's Lenten Pie is done, remove it from the oven and let it cool for a few minutes before cutting it into pieces. Serve it warm, with yogurt or a lean sauce of your choice. Buon appetito! Popay pie NOTE: If you want to make this pie with a thin crust, then make a separate mushroom filling mixed with ricotta, and especially kale mixed with ricotta. You will add half an onion and one and the other filling with the addition of minced garlic. The shape of this pie is not important, it can be round or rectangular, it depends on which pan you have and which dough you bought, because it is available in round and rectangular shapes. For this round dough you will need 28 - 30 cm in size. For the rectangular dough, you will need a size of 35 x 40 cm. If you don't have both, then you can bake from an oven tray, which you have previously lined with baking paper. You can keep the rest of the pie at room temperature. covered for up to 2 days, in case you keep it in the fridge in the summer. Do you want to try something a little different? Simple Cheese Pie Roll Collard green pie, made from ready-made Crusts Puff pastry with Minced meat Filling Serbian Gibanica Cheese Pie Burek with Minced meat Potato Pie with Onion #popay #pie #savorypie #ricotta #cheese #kale #spinach #greencollard #puffpastry #appetizer #breakfast #dinner #food #delicious #easybaking #simple #recipe Use the contact form for questions or advice. I would be happy if you would comment on my recipes and put like.
- Goulash for 2
## Delicious Goulash Recipe for Two Goulash for 2 I prepared this stew using the remaining beef stored in my freezer from a previous occasion, as I consistently reserve a portion for future use. I had approximately 650 grams available. This recipe is both quick and easy to prepare, offering an economical option. It pairs well with pasta, polenta, or boiled potatoes. Only a few ingredients are required to create this delicious dish. Please follow the recipe. Ingredients : simple, total time: 150 min., 2 servings 2 Tbsp Olive oil EVO/ or vegetable oil 1. 5 medium onion/ finely chopped 650 g veal meat/ diced 1 tsp red ground paprika 1 bay leaf 1 Tbsp tomato concentrate + 100 ml water about 300 ml water/ divided salt and pepper to taste Goulash for 2 Preparation : Finely chop the onion, and cut the meat into cubes. In a medium and deep saucepan, heat the oil over low-moderate heat Add the chopped onion and stir for a few seconds. Cover the pot and simmer for about 20 minutes, stirring occasionally. After the specified time, add the diced meat and mix with the onion, add a little salt and pepper to taste - cover the pot, cook for about 35-40 minutes, until the meat releases its liquid. Add the bay leaf and red ground pepper, stir and cover. Cook for about 15-20 minutes. After the specified time, reduce the heat, add the mixed concentrate and 100 ml of water. Mix everything well with the ingredients and cover again. Pour water as needed every 15 minutes, I poured gradually about 300 ml until the meat softened and the sauce thickened and reduced by half. Serve with your favorite side dish as desired. Buon appetito! Goulash for 2 NOTE: If you want, you can add half a teaspoon of hot pepper to this stew. Keep the rest of the food covered in the refrigerator for up to 3 days. Do you want to try something a little different? Veal Goulash Goulash recipe Italian-style Goulash Mushroom Goulash The Best Goulash with Oatmeal Goulash with Gnocchi Lena Beef Goulash Hungarian Fantastic Veal Goulash Lena #goulash #veal #meat #economic #recipe #lunch #meal #dinner #maindish #maindishes #food #pasta #potatoes #polenta #foodlover Use the contact form for questions or advice. I would be happy if you would comment on my recipes and put like.
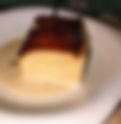
- Trilece Turkish dessert
## Discover the Delight of Trilece: A Classic Turkish Dessert Trilece Turkish dessert This Turkish Trilece dessert is expertly prepared, offering a delightful and efficient culinary experience. It is exceptionally delicious and moist, soaked in milk cream to enhance its perfect taste. Additionally, it features a caramel topping that can be artistically decorated with a toothpick to create floral patterns. For a beautiful and delectable treat to enjoy during the summer, this cake is an ideal choice. Follow the recipe to create this exquisite dessert. Ingredients : simple, total time: 55 standing time: 3h Biscuit : 5 eggs/ room temp. 5 Tbsp of granulated sugar 1 bag of vanillin-sugar/10 g 5 Tbsp of smooth flour 1 Tbsp of density 1 tsp of baking powder/ 5 g 20x30 cm baking dish Milk topping: 400 ml of sweet cream 300 ml of whole milk 200 ml of sweetened condensed milk Caramel topping: 100 g of crystal sugar 200 ml of sweet cream Trilece Turkish dessert Preparation : Biscuit : Separate the whites from the yolks. Beat the egg whites until stiff, gradually adding sugar and vanillin-sugar. When you get a shiny and firm mass, add the egg yolks one at a time and beat briefly at a lower speed. In a separate bowl, mix the flour, shortening and baking powder. Gently mix the dry ingredients into the egg mixture, using a spatula and light movements from the bottom up. Pour the mixture into a 20 x 30 cm baking tray lined with baking paper. Bake in a preheated oven at 180 °C for 20–25 minutes, until the biscuit is slightly golden. Check with a toothpick - if it comes out dry, the biscuit is ready. Leave the baked biscuit to cool for 5-10 minutes, then prick it all over with a toothpick or fork. Milk Topping: Combine the sweet cream, milk and condensed milk in a bowl and mix gently. Pour the topping evenly over the warm biscuit. Leave the cake to cool completely and absorb the liquid, at least 2 hours, ideally overnight in the refrigerator. Caramel Topping: In a saucepan with a thick bottom, melt the sugar over medium heat, without stirring, until it turns a golden-brown color. Remove from the heat and carefully add the sweet cream, stirring constantly. Return to a low heat for a short time until the caramel is uniform and slightly thickened. Allow the caramel to cool slightly, then spread it evenly over the cooled cake. Return the cake to the refrigerator for another hour before cutting. Cut with a sharp knife and serve well chilled. Buon appetito! NOTE: If you are not a fan of caramel, you can skip this step. The cake is certainly refreshing and delicious without it. Keep the cake covered in the refrigerator for up to 3 days. Do you want to try something a little different? Trilece Cake Trilece dessert Turks Trileçe- Turkish Dessert #trilece #turkish #dessert #cake #food #turkishfood #turkishrecipe #delicious #simple #recipe Use the contact form for questions or advice. I would be happy if you would comment on my recipes and put like.
- Cinnamon rolls
## Irresistible Cinnamon Rolls: A Sweet Delight Cinnamon Rolls Irresistibly fragrant and soft cinnamon rolls serve as an ideal dessert for any occasion, particularly popular during the Christmas season. This exceptional recipe features remarkably soft dough. While the preparation is straightforward, it is essential to allow the dough to rest, as is customary with many desserts. During this period, you can recharge and prepare to continue crafting this delightful treat. Let us create them together by following the recipe. Cinnamon Rolls Ingredients : simple, preparation time 45 min., 90 min standing time, 12-13 rolls Dough : 1 Tbsp dry yeast +1 Tbsp granulated sugar 250 ml lukewarm milk 2 eggs/ room temp. 1 tsp vanilla exreact/ or vanilla sugar 1 full tsp grated lemon peel 1/2 tsp pinch of salt 100 g granulated sugar 550 g flour 00 + 20 g for work surface Filling : 200 g brown sugar 30 g cinnamon powder/ 3 full Tbsp 60 g soft butter/ room temp. for spread dough - or 6 Tbsp olive oil EVO Topping : 250 g Philadelphia cheese/ or Mascarpone - room temp. 80 g soft butter 100 - 120 g powdered sugar Cinnamon Rolls Preparation : Take out of the refrigerator 30-60 minutes before: butter, Philadelphia and eggs, let them stand at room temperature, the butter should soften well. Raising Yeast : Mix dry yeast, 1 spoon of sugar with 250 ml lukewarm milk in a small bowl - let it stand for 10 minutes. Dough : In another bowl, mix flour, the rest of the beaten sugar with eggs, a pinch of salt, vanilla extract or lemon peel, and raising yeast with milk. To begin with, mix with a wooden spoon, then combine into a smooth compact dough by hand if you have a dough machine you can do everything directly with it! When you have obtained a smooth and compact dough, form it into a ball - coat the tops of the dough with oil with the help of a brush. Let the dough rest in bowl for 60 - 90 minutes to double in size, cover with a clean cloth - set aside in a warm place. While the dough is standing , make the filling. Cinnamon Rolls Cinnamon Filling: In a small bowl add cinnamon, brown sugar and mix with spoon. Set aside. When the dough has doubled in size, flour the work surface and knead the dough again by hand a little at a time, and with the help of a rolling pin make a rectangle a thickness 3 - 4 mm. With the help of a brush, coat the surface of the dough with soft butter. Then cover the entire surface evenly with cinnamon filling with help of spoon. Carefully roll into a roll - cut into 3 cm thickness with a help of sharp of knife. Place the rolls on a baking tray lined with baking paper. When you transfer the rolls, keep them upright and in the same shape as you cut them so that the filling does not fall out! Cover the rolls with a clean cloth and let them rest for 30 minutes. Baking : Bake in a preheated oven at 180°C for about 15-20 minutes. While the rolls are baking, make the topping. Topping : Beat the rest of the butter, Philadelphia cheese and powdered sugar with a mixer into a smooth cream. Spread a spoonful of this topping on the ready and hot rolls and spread them with the help of a brush on all sides. Let it sit for 5-10 minutes. After that, enjoy the mouthfuls of this wonderful soft dessert. Buon appetito! Cinnamon Rolls NOTE: I did not have an adequate baking dish at that time for baking. You will need place for 12-13 rolls, 33 x 25 cm dimension. You can use a fresh yeast about 30g instead of dry yeast. I made the dough in a dough machine, because it saves me a lot of time and I don't tire my hands. The dough was smooth and compact. You can add more sugar to the dough if you like a sweeter dough, up to 20 g. In my opinion, this is quite enough, you shouldn't overdo it with a lot of sugar! If you like the taste of cinnamon, add more cinnamon for 1 full spoon. If you want less sweetness, add 80-100 g of powdered sugar for the topping, I added 120 g. It is very important that the butter is soft before starting to make this dessert. This also applies to eggs and cheese. Keep the rolls in a cold place, covered in an airtight box for up to 5-6 days. You can reheat them a little if you want them warm in the microwave or in the oven. Cinnamon Rolls Do you want to try something a little different? Cinnamon Buns Cinnamon Brioche Giant Apple Cinnamon Roll Cinnamon Creamy Rolls Muffins with Apple and Cinnamon Cinnamon Rolls #soft #cinnamon #rolls #easycooking #easyrecipes #easybaking #dessert #simple #cake #easybaking #recipe #delicious #holidayrecipe £dough #Christmasrecipies Use the contact form for questions or advice. I would be happy if you would comment on my recipes and put like.
- Nutella Mousse
## Decadent Delight: Nutella Mousse Recipe Nutella Mousse Here's a straightforward and delightful recipe for Nutella mousse that you can prepare at home. This recipe requires only a few ingredients: mascarpone, eggs, Nutella, powdered sugar, cocoa powder, and whipped cream for decoration. This mousse can be served as a standalone dessert in cups or used as a filling for cakes and pastries. It is both quick and easy to make. Please follow the recipe. Ingredients : simple, total time: 10 min. 400 g Mascarpone 3 cold and fresh small eggs 60 g powdered sugar 60 g Nutella bitter cocoa powder to taste whipped cream, ground hazelnuts for decoration - optional Nutella Mousse Preparation : Beat mascarpone with 30 g powdered sugar in a deep bowl and beat until the cream becomes uniform. Add one egg at a time to the mixture and beat at the same time. Add the Nutella cream and continue to beat briefly. In another bowl, beat the egg whites with the rest of the powdered sugar, until stiff peaks form. Add the whipped snow to the mascarpone and egg mixture and mix with a spatula. At the very end, add cocoa to taste. Combine it all well. Pour the mixture into glasses and garnish with whipped cream. sprinkle with a little cocoa powder. Keep in the fridge to set for up to 2 hours. Buon appetito! NOTE: You can use this cream as decorations for cakes or as a filling for pastries. If you use it to fill pastries or cake filling, then make a cream with one egg and make sure it is a thick cream. Keep the dessert for up to 2 days in the refrigerator, covered. Do you want to try something a little different? Chocolate Bombs Chocolate Glaze Chocolate Biscuits with Coconut #Nutella #mousse #Nutellamousse #dessert #cream #simple #delicious #recipe #food #easycooking #dessertlover #cakes Use the contact form for questions or advice. i I would be happy if you would comment on my recipes and put like.
- Delicious Baked Chicken rolls with grilled Mushrooms and Rice
## Savory Baked Chicken Rolls with Grilled Mushrooms and Rice Delicious Baked Chicken rolls with grilled Mushrooms and Rice Here is a delightful recipe for Delicious Baked Chicken Rolls with Grilled Mushrooms and Rice, one of my favorites. This dish is flavorful, satisfying, and ideal for a family dinner or a special occasion. The preparation is straightforward and quick, requiring only 40 minutes. Follow the recipe. Delicious Baked Chicken rolls with grilled Mushrooms and Rice Ingredients : simple, total time: 45 min, 3 servings For Chicken rolls: 600 g chicken breast/ cut into 6 thin fillets salt and pepper to taste 1 mozzarella/ cut into thin slices or grated 2-3 cherry tomatoes/ cut into thin slices dry basil/ or oregano to taste (if you not using pancetta flour as needed) little oil for frying For Mushrooms: 400 g button mushrooms/ cut into leaves or whole 20 g cube of butter 1 small clove of garlic/ minced salt and black pepper to taste 1 tsp flour 130 ml water 1 Tbsp fresh parsley/ or 1 tsp dry 2 Tbsp Olive oil For Rice: 1 Tbsp Olive oil EVO 1 cup rice/ washed 1/2 small onion/ finely chopped 1 tsp dry bio spice Vegeta 700 ml water pinch of salt black pepper to taste (Mixture: olive oil 20 ml+1 clove of garlic minced+ 1 Tbsp fresh parsley - optional) Delicious Baked Chicken rolls with grilled Mushrooms and Rice Preparation : You can cook the mushrooms in two ways: leave the mushrooms whole, just separate the stalks and bake them later, or cut them all into strips and bake them all together. First variant Mushroom Preparation : Wash the mushrooms well and separate them from the stems, then cut the mushrooms into thin slices. Clean the stalks of any dirt and cut them into thin slices. Pour the oil into a frying pan and heat over low-medium heat. Add the chopped mushrooms, season with salt and pepper, stir and cover. Simmer for about 10-15 minutes until the liquid has evaporated. Add the minced garlic, butter and chopped parsley. Mix everything well, cook for a 1-2 minutes. When the butter has melted, add the flour mixed with 130 ml of water., simmer a few minutes until the sauce thickens, turn off the heat. Cover to prevent the mushrooms from cooling. Delicious Baked Chicken rolls with grilled Mushrooms and Rice Second variant of preparing Mushrooms: Separate the well-washed and cleaned mushrooms from the stems. Cut the stalks into thinner leaves. Pour the olive oil into a small pan and heat it over low to moderate heat. Add the whole mushrooms, turn them to the bulging side, add salt and pepper to taste and cover the pan. Fry them for about 8-10 minutes and then turn them over, and continue to fry them for about 8-10 minutes, the liquid must evaporate. Remove mushrooms with a slotted spoon in a plate. In the same pan, add a little olive oil and chopped stems, season to taste and cover, simmer for about 10 minutes. Add butter and garlic, as soon as it smells, add flour mixed with 130 ml of water, chopped parsley and whole mushrooms, mix everything well and wait for the sauce to thicken for about 1-2 minutes, stirring constantly. Cover the finished mushrooms so they don't cool down. Chicken rolls Preparation : Season the chicken fillets with salt and pepper on both sides, beat them with a meat mallet, then place the 2 small thins tomato slices and thin slices of mozzarella on the surface of the meat, add a little salt and sprinkle with oregano or basil. Roll into a roll, close both sides with a toothpick and two slices of pancetta each around one roll. Using a toothpick is to connect the side so that the filling doesn't come out. Repeat all this with the rest of the chicken fillets and the rest of the ingredients. (If you don't like pancetta you can roll in flour as you like, I didn't do that, because I used a pancetta.) You can bake these rolls in the oven or in a pan. This time I baked in the oven because I decided not to dirty the stove and I avoided excess oil. Fry the rolls for about 4-5 minutes on each side in the pan . If you want to bake in the oven like I do, turn on the oven at 220°C, and wait for it to heat up. Take a 20 x 30 cm dish, line it with paper and coat it with a little oil, arrange the rolls and with the help of a brush coat each roll with oil. When the oven is heated, reduce it to 190°C, and bake for about 40 minutes. After 25 minutes, turn the rolls and bake until the end. Be sure to remove the toothpicks from the rolls. While the rolls are baking, make the rice. Rice : Pour olive oil and chopped onion into a small pan, fry for a few minutes, until soft. Add the washed and drained rice and simmer for about 2 minutes, stirring constantly. Immediately add 700 ml of water, a teaspoon of Vegeta bio seasoning, a little salt and pepper to taste. Reduce the heat to low-moderate and cook until the rice swells, about 17- 20 minutes. NOTE This is optional: Towards the end, add the mixture of olive, minced garlic, and parsley mix everything well about few seconds. Turn off the heat. Serve chicken rolls warm with grilled mushrooms and rice. Buon appetito! Delicious Baked Chicken rolls with grilled Mushrooms and Rice NOTE: You can also use smoked bacon, but it is important that it is thinly sliced. Instead of mozzarella, you can use any other melted cheese, Gouda, Trappist, Cheddar or others. Do not heat the rice, but bring it to room temperature 2 hours before consumption. Keep the rest of the food covered in a cool place for up to 2 days. Delicious Baked Chicken rolls with grilled Mushrooms and Rice Do you want to try something a little different? Chicken Roll Fillets with Bacon Stuffed Chicken Rolls-Skewers with Sesame Seeds Chicken bombs Fried Chicken cutlets Chicken Kebabs- Čevapčići Crispy Chicken Chinese Fried Chicken #baked #chicken #rolls #chickenfikkets #chickenbreast #pancetta #bacon #mushrooms #rice #food #maindishes #side dish #lunch #dinner #foodlover #delicious #simple #recipe #serbianfood Use the contact form for questions or advice. I would be happy if you would comment on my recipes and put like.
- Delicious Black Cabbage with Stewed Potatoes
## Delicious Black Cabbage and Stewed Potatoes Recipe Delicious Black Cabbage with Stewed Potatoes Black cabbage with stewed potatoes is a versatile and delightful side dish that pairs excellently with any type of meat or fish, whether from the sea or river. Not only is it quick and easy to prepare, taking approximately 30 minutes, but it is also nutritious and rich in vitamins. This dish serves as a healthy alternative to the summer version of potatoes and Swiss chard. Please follow the recipe for preparation instructions. Delicious Black Cabbage with Stewed Potatoes Ingredients : simple, total time: 30 min. 2-3 serving 3 Tbsp olive oil EVO 1/4:large red onion/ finely chopped 1-2 medium cloves of garlic/ minced - optional 1 bunch of black cabbage 3 medium potatoes/ cut into rings 120 ml liquid from boiled cabbage 1 tsp dry bio spice Vegeta 1/4 tsp salt black pepper to taste slice of lemon for sprinkle/ as desired Delicious Black Cabbage with Stewed Potatoes Preparation : Wash the black cabbage well and peel the potatoes then clean of impurities. Cut the potatoes into 6 mm thick rings. Clean the black cabbage from the thickened veins and cut the stem in the middle. Pour half of the water into a large pot and add a teaspoon of salt and wait for it to boil. When the water has boiled, add black cabbage and potatoes and leave to cook in boiling water for about 10 minutes. During this time, if you want to add garlic, clean it, chop it finely or pass it through the machine and grind it, heat the olive oil to low moderate heat. Finely chop the onion, then put it on hot oil and fry it for about 5 minutes until it softens. Meanwhile, strain the potatoes and black cabbage and reserve 150 ml of the liquid from the pot. immediately add potatoes and black cabbage to the pan, mix everything well for 4-5 minutes, Pour 1/2 the liquid in which the potatoes and black cabbage were cooked. Add spices, salt, pepper and vegeta and mix everything well and cook for the next 15 - 20 minutes, occasionally adding the rest of the liquid. Turn off the heat. You can serve this side dish with any meat and fish with the addition of a slice of lemon. Buon appetito! Delicious Black Cabbage with Stewed Potatoes NOTE: If you want to make squid like in the picture, see the recipe here. You can add garlic to this side dish if you want, I didn't add it in any case, it's delicious without garlic. You can add a cube of butter towards the end of this side dish if you want, I tried to make it as simple as possible. If you want to eat it as a salad, add a little lemon juice, you can also use apple cider vinegar instead. Keep the rest of the food covered in the refrigerator for up to two or three days. Delicious Black Cabbage with Stewed Potatoes Do you want to try something a little different? #delicious #blackkabbage #kale #greens #stew #potatoes #sidedish #salad #simple #recipe #food #addition Use the contact form for questions or advice. I would be happy if you would comment on my recipes and put like.
- Delicious Paccheri with Tuna in Tomato sauce
Delicious Paccheri with Tuna in Tomato sauce If you enjoy Italian cuisine, you know that pasta dishes can range from simple to spectacular. One recipe that stands out for its bold flavors and satisfying texture is paccheri with tuna in rich tomato sauce. This dish combines large, tube-shaped paccheri pasta with a hearty tomato sauce infused with tender chunks of tuna. It’s a perfect meal for those who want something comforting yet elegant, easy to prepare but full of taste. This post will guide you through the ingredients, preparation steps, and tips to make this dish a favorite in your kitchen. Whether you’re cooking for family or guests, this recipe offers a delightful balance of flavors and textures that will impress everyone at the table. Follow recipe. Ingredients : simple, total time: 30 min, 2 servings Olive oil EVO to taste 250 g paccheri pasta+ water +1 tsp salt 5 cherry tomatoes/ or 2 tomatoes - chopped 160 g canned tuna/ filtered 2 cloves of garlic/ minced salt and pepper to taste 3 anchovies 6 black olives/ halved 1 Tbsp tomato concentrate +120 ml of water 1 Tbsp fres basil leaves/ finely chopped/or 1 tsp dry basil or to taste Delicious Paccheri with Tuna in Tomato sauce Preparation : Prepare all ingredients as described above and set aside. Add water for the pasta, add a teaspoon of salt. Wait for it to boil. Add the pasta and cook according to package directions. Strain the dough well. Make sure you do this halfway through cooking this sauce. Heat the olive oil on a low-moderate heat, then add the filtered tuna and the tomatoes that you have cut into small pieces. Simmer until the tomatoes are soft and stir occasionally. When the tomatoes have softened, add minced garlic, stir few seconds, add concentrate mixed with 120 ml of water, halved olives and stir 7-10 minutes. Season to taste, sprinkle with basil. When the sauce has thickened, add the strained paccheri pasta, mix well and turn off the heat Serve the dish warm with the addition of grated Parmesan if desired. Buon appetito! NOTE: For a more intense taste in this dish you can add capers instead of anchovies, some spicy flecks, and little dry white wine while the tomatoes are cooking and instead of tomatoes you can replace it with tomato paste if you like. Paccheri of pasta also originating from the Naples region but you can also exchange for some others if you want a smaller pasta. Do you want to try something a little different? Macaroni with Tuna in Tomato sauce Mediterranean Tuna Sauce for any Pasta Pasta with Tuna in Tomato Sauce Sicilian Pasta Tuna in Tomato Sauce Pasta in Tuna Tomato and Sour cream sauce #paccheri #pasta #tuna #tomato #sauce #italianfood #italianrecepies #food #meal #maindishes #lunch #dinner #simple #recipe #Mediterannianfood #delicious #foodlover Use the contact form for questions or advice. I would be happy if you would comment on my recipes and put like.
- Dessert of Lard and Puff Pastry(Salčići), Serbian Dessert
Dessert of Lard and Puff Pastry(Salčići), Serbian Dessert Dessert made of lard and puff pastry, fantastically easy to lick your fingers. My mom always gladly prepared this dessert for us on the eve of Easter or Christmas. This is a Serbian traditional cake that is prepared in every house. The recipe is old and goes from generation to generation. The recipe is simple, you just have to take about 3 hours to stand the dough. Follow this wonderful recipe of mine! Follow recipe. Ingredients: very easy, total time:4 h, standing dough 3 h 1 Tablespoon fat a little salt and sugar 1 lemon/ juice and zest 200 ml of cold water 2 eggs 2 egg yolks 50 ml brandy (plum brandy) 650-700 g of soft flour 200-250 g of Lard plum jam powdered sugar with vanilla Dessert of Lard and Puff Pastry (Salčići), Serbian Dessert Preparation: Take a deeper plastic bowl and put 1 tablespoon of fat, a pinch of salt, a pinch of sugar, juice, and zest of 1 lemon, 200 ml of cold water, brandy (plum brandy), 2 whole eggs and 2 yolks. Mix all this by hand and gradually add 700 g of soft flour. The dough must not stick to your hands. Knead the dough for about 5 minutes until it is soft, smooth, and elastic. Cover the dish with a cloth or nylon and let it rest for about 1 hour at room temperature. Dough processing: When the dough has rested, fold it into a rectangle about 5 mm thick. Spread it evenly with a thin layer of lard and start folding. Fold the longer side in half, then coat with lard again. Then fold the shorter pages in half and coat with a thin layer of grease. Finally, fold the dough like a book and place it on a lightly floured plate, cover with a cloth and leave in the fridge to rest for 1 hour. You need to repeat this 2–3 times. The dough should be coated a total of 3 times and left to cool for 3 hours. After 3 hours, stretch the dough into a rectangle with a rolling pin to a thickness of 8 mm and cut it into several rectangles 5 × 7 cm long. Put one teaspoon of plum jam in the middle of each, fold the cake in half, without any pressure, joining or gluing. Arrange on a baking sheet lined with baking paper, leaving space between the cakes, as they will grow quite a bit. Preheat the oven to 250 °C. Place a metal plate or a small pot of water on the bottom of the oven, which will evaporate during the baking of the cake. Thus imitating a steam oven, which is otherwise ideal for baking all types of puff pastry. Put the cookies to bake only when the oven reaches the temperature. Bake for about 10–15 minutes, until slightly browned, if possible without opening the oven (so that it does not cool down so that the cakes do not “burn”, so that steam does not come out …). Leave the baked cakes to cool in the pan, and sprinkle them with powdered sugar and vanilla. When they cool, you can stack them in one deeper bowl on top of each other. The combination of plum brandy, lemon, fat and plum jam is great. Brandy gives a fantastic taste to cakes, alcohol is not felt, only aroma. Buon appetito! #food #dessert #lard #puffpastry #serbianfood #salcici #recipe #food #foodblogger #blog #coffeetimelena #jam #serbian #treat #coffeetimelena Use the contact form for questions or advice. I would be happy if you would comment on my recipes and put like
- Salmon with Spinach and Bacon in Cream sauce
## Delectable Salmon with Spinach and Bacon in Cream Sauce Salmon with Spinach with Bacon in Cream sauce This recipe offers a delightful and efficient culinary experience, featuring a harmonious blend of three key ingredients that deliver an exceptional aroma and flavor. Utilizing salmon, bacon, and spinach from the freezer, this dish is enhanced with a touch of sun-dried tomatoes and Parmesan in a creamy sauce. The result is a truly remarkable taste. In just thirty minutes, you can savor this exquisite meal. Follow the recipe to prepare it together. Salmon with Spinach with Bacon in Cream sauce Ingredients : simple, total time: 30 mi. 2 serving 100 g salmon fillets/ chopped 180 g baby spinach 1 small red onion/ finely chopped 50 g smoked bacon/ diced 2 large cloves of garlic/ minced 1 piece of dried tomato/ chopped, or a dot of concentrate - optional 250 ml cooking cream 25 g grated Parmesan cheese 1 tsp red ground paprika 1/4 tsp of salt black pepper to taste 2 Tbsp Olive oil EVO 240 g tagliatelle pasta Salmon with Spinach with Bacon in Cream sauce Preparation : Rub allspice on the in salmon fillet well on both sides. Fry the salmon in a pan with a little olive oil until golden brown, about 4–5 minutes each side, to low to moderate heat. Remove the salmon and chop it finely. Fry the chopped onion in the same pan until soft and transparent. Now add the diced bacon, stir, and fry until the bacon becomes transparent. After that, add spinach, simmer until soft, about 7 minutes. Now add the chopped garlic, stir well and as soon as it smells, pour cooking cream. Immediately season with a pinch of salt, black pepper, and a drop of concentrate (or chopped dried tomatoes). Return the salmon to sauce, cover, and cook for another 5 minutes. Towards the end, add grated Parmesan cheese and stir the ingredients well for about 3 minutes. Cook the tagliatelle according to the instructions on the package, strain them well and mix them with the sauce. Serve warm with pasta with sprinkling Parmesan cheese. Buon appetito! Salmon with Spinach with Bacon in Cream sauce NOTE : Do not add a lot of salt because the salmon fillets already have salt in them. If you have more members in the family, double the ingredients and cook in a wok pan. This dish is good to be eaten during the day and not left for tomorrow. If you are already cooking for yourself, then add the amount of sauce to a small saucepan and mix with the tagliatelle. Do you want to try something a little different? Lasagna with Salmon Creamy Gnocchi with Salmon Tagliatelle with Salmon Creamy Salmon with Tagliatelle and Leeks Creamy Fragrant Salmon Cannelloni with Spinach - Ricotta and Smoked Salmon #salmon #spinach #bacon #cream #sauce #tagliatelle #italianfood #italianrecepies #simple #delicious #food #lunch #dinner #easycooking #pasta #italianpasta Use the contact form for questions or advice. I would be happy if you would comment on my recipes and put like.
- Light Chinese Rice with Vegetables
##Deliciously Light Vegetable Chinese Rice Light Chinese Rice with Vegetables This light Chinese rice with vegetables offers a simple preparation and is ready in no time. It's a dietary option, perfect for summer and for those on a diet. If you prefer to include meat, please refer to the entire text for guidance. Follow recipe. Ingredients: cup-240 ml, simple, total time: 35 min., 3 - 4 servings 1 cup of basmati rice 1 small piece — 2 cm of fresh ginger-finely chopped 3–4 cloves of garlic/ minced 1 Tbsp of chopped celery 3-4 Tbsp of sweet-sour sauce 1 tsp of soy sauce 1 tsp of Chinese vinegar 1/2 tsp white pepper 2 Tbsp olive oil EVO 1 Tbsp of sesame oil Vegetables: 2 carrots/ cut into small cubes 1/2 cup fresh cabbage/ shredded and cut 1 finely chopped paprika/ or other vegetable 1/4 cup chopped green pods 5 pieces of spring onions white part — chopped, green part chopped separated Light Chinese rice with vegetables Lena Preparation: Soak basmati rice in water for 10 minutes — then cook in a ratio of 1 cup of rice, 2 cups of water. When the rice is cooked, leave it to cool completely. Just add olive oil and set aside. Chop the vegetables into pieces of approximately equal size. Heat the olive and sesame oil in a pan and simmer the ginger, garlic, and celery over a medium heat until they become crispy. Be careful not to darken it because garlic can ruin the complete dish when it burns! Add the rest of the vegetables: spring onions (only the white part), carrots and shredded cabbage. Simmer briefly, as the vegetables should remain crispy. Finally, add the paprika and simmer for another 1-2 minute. Add salt, pepper, vinegar, sweet and sour sauce, soy sauce to the vegetables and mix everything well. At the very end, add the cooled rice and green parts of the spring onions, mix everything well and serve with a fresh salad, fried vegetables or, if you can't do without it, some meat. In this rice you can add everything from vegetables that you have in the house peas, zucchini, eggplant, broccoli, and even mushrooms. NOTE: For a better taste, you can add a handful of sweet corn. If you want to add the meat to the rice, then marinate the diced white chicken or beef meat ( cut into thin leaves bites) in a little soy sauce and olive oil, fry it briefly in a pan and set aside. Then add to the rice at the very end. Keep the rest of the food in the refrigerator for up to 2 days. Heat in a pan or microwave. Do you want to try something a little different? Chinese Fried Chicken Chinese Chicken with Bamboo and Cashews Enriched Chinese Spring Rolls Chinese-style Risotto with Chicken and Peas Cozy Tamari Soup with Noodles Chinese White Rice Lena #light #chinese #rice #with #vegetables #asuanfood #chinesefood #delicious #simple #recipe #easypoking #delicious #tasty Use the contact form for questions or advice. I would be happy if you would comment on my recipes and put like.