Search Results
1908 results found with an empty search
- Cheese Pastry
Cheese Pastry ##Irresistible Cheese Pastries: The Perfect Anytime Appetizer Cheese pastries are the perfect appetizer for breakfast or dinner, or for some company while watching a movie. They taste perfect and have a soft-crunchy and irresistible taste. They are very easy to make! For a larger dose, double the ingredients. Follow recipe. Cheese Pastry Ingredients : simple, standing time: 2h, total time: 2h 30 min., about 40 Dough: 250 g flour 150 g butter/ grated or chopped 200 g crumble cow cheese/ or feta Greek cheese 1 bag baking powder/ 10 g 1.5 tsp salt 1 large egg For Sprinkle : Cumin as desired Sesame seeds as desired and : 1 scrambled egg for spread Cheese Pastry Preparation : Mix salt, flour, cheese and baking powder, grated butter and egg. Combine it all well. When you have a good combined dough mixture, wrap it in foil and leave it in the fridge for 2 hours. Roll out the dough to the thickness of a 4-5 mm and cut into sticks 2 cm or roll out the dough with a mold according to your preference. Place them on baking paper in an oven tray. Brush with scrambled egg and sprinkle with sesame seeds or cumin. Bake in a preheated oven at 180°C for about 15–20 minutes, until they turn golden brown. Serve warm with yogurt or sour milk. Buon appetito! Cheese Pastry NOTE: In this recipe, I used Greek feta cheese. Keep the pastry in a closed box 2 days or on a plate covered with nylon foil. Do you want to try something a little different? Puff Pastry Scones Puff pastry with Minced meat Filling Quick Puff pastry Pie with Cheese Smoking Pastry-Turkish Meal Crackers with Cheese Crackers with Cheese Pork Crackling Biscuits #cheese #pastry #food #simple #recipe #delicious #easy #fast #savory #appetizer #breakfast #dinner #foodporn #foodlover #coffeetimelena Use the contact form for questions or advice. I would be happy if you would comment on my recipes and put like.
- Delicious Fried Eggplants
Delicious Fried Eggplants ## Delicious Meat-Free Eggplant Recipe for Dieters These eggplants are ideal for replacing meat if you are on a diet. Every time I make them, everyone asks about this recipe, how delicious they are. It will take about 35 minutes to make, and it's very easy to put together! Follow recipe. Delicious Fried Eggplants Ingredients : simple, total time: 40 min. 2-4 serving For Blanching Eggplants : 2 eggplants/ cut into slices 1 cm lengthwise 1. 5 liters of boiling water 1 tsp salt 1 tsp garlic powder 1/2 tsp ground black pepper 2 sage leaves/ or bay leaves 1 Tbsp acid vinegar 6% For Breading Eggplants: 2 large eggs/ or 3 small eggs 1/2 tsp salt 1 tsp seasoning for chicken meat/ or dry bio spice Vegeta 1 tsp dried parsley/ or oregano 1 tsp red ground paprika 1 Tbsp mayonnaise/ or sour cream and : 1 cup breadcrumbs/ 240ml 2 Tbsp cornstarch 1/2 tsp black pepper 1 Tbsp dried parsley Delicious Fried Eggplants Preparation : Wash the eggplants well and peel off the skin and remove the stalks. Cut them lengthwise to a thickness of 1 cm. Pour 1 and a half liters of water into a deep medium pot, add all the ingredients from the description for blanching, and wait for it to boil. Add the cut slices of eggplant to the boiling water. Cook for about 2–3 minutes. Take them out with a slotted spoon and place them on a plate, let them cool and discard the excess liquid from the plate. When the slices have cooled, absorb the excess liquid with a paper towel. Preparation Breading : Beat the eggs in a deep plate and add salt, seasoning for chicken, parsley, paprika and mayonnaise, mix everything well with a whisk. In another deep bowl, add the crumbs, parsley, corn starch, dried parsley and pepper, mix it all well. Roll the slices well, first in breadcrumbs, then in eggs, drain well and immediately fry them in hot oil on moderate heat, until they are golden brown on both sides. Place the finished fried eggplant slices on a kitchen towel to absorb excess fat. Serve with a sauce of your choice and a side dish of your choice. Buon appetito! Delicious Fried Eggplants NOTE : Cover the rest of the fried eggplant with aluminum foil and keep in the refrigerator for up to 2–3 days. Do you want to try something a little different? Simple Fried Eggplants Fried Eggplant Juicy Fried Eggplants #delicious #fried #eggplants #simple #recipe #food #maindish #sidedish #easy #breading #blog #recipies #foodporn #coffeetimelena Use the contact form for questions or advice. I would be happy if you would comment on my recipes and put like.
- Stew with meat, Vegetables and Kale
Stew with meat, Vegetables and Kale ## Hearty Kale and Vegetable Stew: A Nutritious Family Sunday Lunch A wonderful soupy meal of kale and vegetables with pork. You can also use beef instead of pork. Besides being easy to prepare, this stew dish is rich in various vitamins and protein. It is very delicious and light meal and ideal for a whole family Sunday lunch. Follow recipe. Stew with meat, Vegetables and Kale Ingredients : simple, total time: about 2 hours, 4-6 serving 3 Tbsp Olive oil EVO 2 medium onions/ finely chopped 2 medium carrots/ cut into rings 700 g pork meat or beef/ diced 2 full tsp red ground paprika/ divided 1+1 2 full tsp dry spice Vegeta/ divided 1+1 3 cloves of garlic/ minced - optional 4 medium potatoes/ diced 1 small kale or cabbage/ diced about 1200 ml + 600 ml water/ divided or beef broth 150 ml water+2 Tbsp flour 2 Tbsp concentrate pepper or 2 tomato sheless 1. 5 tsp salt/ or to taste 1 tsp black pepper/ or to taste 1 Tbsp parsley leaves/ finely chopped to taste — optional Deep pot 5 liters Stew with meat, Vegetables and Kale Preparation : Prepare all the vegetables and meat from the description above. Prepare and put all the spices next to you. If you want to use broth, then first prepare it beforehand, put the beef cube for the soup in 1300 ml of water. Let it boil, turn off the heat. Then you don't need to add Vegeta dry seasoning. Put the chopped onion in a deep pan with oil to stew for about 5–10 minutes, with occasional stirring. Then add the prepared carrot and meat. Season with 1 teaspoon of Vegeta bio spice and 1 teaspoon of paprika, mix and cover the pot. Let it simmer 25–30 minutes and allow the meat to release its liquid and the onion to melt. Stir occasionally every 10 minutes on low to moderate heat. After the elapsed time, add chopped garlic, (this is optional) as soon as it smells, put the cut potatoes and kale. Simmer covered for about 40 minutes. When the time is up and the vegetables have softened, add 600 ml water, tomato concentrate, 1 teaspoon red ground paprika, 1/2 teaspoon bio spice Vegeta, salt and black pepper to taste. Immediately mix 2 spoons of flour with 150 ml water then add to all the ingredients, mix all well and leave it to cook covered for another 25–30 minutes, covered to low moderate heat. Let it boil. If you want it, add finely chopped parsley. Serve immediately warmed with a slice of bread. Buon appetito! Stew with meat, Vegetables and Kale NOTE: If you do not want to use flour for the thickness of this dish, you can cook one potato on the side and blend it with a little water into a cream, then add it to the other ingredients. You can add some more carrots if you like. If you are a spicy lover, you can add half a teaspoon of ground hot pepper. For an even better taste, you can add 1 fresh pepper cut into cubes. You can use cabbage instead of kale. Pour the rest of the dish into a small pot and keep in the refrigerator for up to 3 days. You can certainly pack it in the freezer in special boxes with a lid for up to 2 months. Do you want to try something a little different? Cabbage soup Sweet Cabbage Cabbage stew with Beef and Vegetables Cabbage with Vegetables, Ribs and Bacon Boiled Cabbage with Potatoes and Ribs Lena Stew Cabbage with Vegetables, Sausages, and Rib Cabbage Soup with Bacon and Sausages Lena Wedding Sauerkraut #stew #with #meat #vegetables #and #kale #soup #food #maindish #meal #pork #beef #light #healthy #lunch #dinner #foodporn Use the contact form for questions or advice. I would be happy if you would comment on my recipes and put like.
- Grilled Sea Bream Lena
Grilled Sea Bream Lena Sea bream is of better quality among white fish. It is the most sought after fish in the world. Mostly like it grilled or from the oven, with the addition of chard and potatoes, which is a phenomenal combination. Here's how I prepare this grilled fish, it's very practical, and it's done quickly. It is a low-calorie food and is suitable for those who are on a diet. Follow recipe. Ingredients: simple, total time: 20 min., 4 serving 4 pieces sea bream/ 1 kg sea bream 4 pieces of garlic/ mashed 200 ml white wine 1 sprig of rosemary 1 tsp dry thyme fresh parsley finely chopped to taste Olive oil EVO to taste dry spice Vegeta to taste salt and pepper to taste Grilled Sea Bream Lena Preparation: Peel a clove of garlic, mash it well in a deep plate and pour in 200 ml of wine. Leave to stand for about 2 hours for the wine to absorb the smell of garlic. Pour oil into another plate, add finely ground pepper and fragrant herbs to taste (parsley and thyme). Clean the fish, wash, and dry well, season to taste with salt and dry spice Vegeta, spread the prepared oil with the help of a sprig of rosemary or a brush. Mix the rest of this oil with the previously prepared wine and garlic. Put the greased fish on a hot grill. During baking, coat the fish with a mixture of white wine with garlic and the remaining oil that you previously coated the fish. Add little salt to the fish when it is half cooked. Fry the fish until it turns brown on both sides. Serve warm with desired side dish. Buon appetito! NOTE : This fish is accompanied by fantastic boiled potatoes with Swiss chard, french fries, salads of your choice, salad, green salad, mixed salad. Serve with a lemon wedge. Keep the rest of the fish covered in the refrigerator for up to 1–2 days. Do you want to try something a little different? Fried Fish Fried Angler fish Fish Stew Lena Fish Stew Lena Fried Fish in the Indian Style Dover Sole fish on Butter simple way Hake with Chives Roasted Hake Sea Bream in Oven, my way Fried Sea Bream Breaded Sardines Fried Hake with Potato Salad and Leeks, simple recipe Sea Bass Baked in the Oven in Juice with a Side Dish of Potato Salad #food #fish #maindish #seabream #simple #delcious #recipe #grilled #foodblog #foodblogger #foodie #fishlover #blog #coffeetimelena #healthy #healthyfood Use the contact form for questions or advice. I would be happy if you would comment on my recipes and put like.
- Wafers with Walnuts and Biscuits
Wafers with Walnuts and Biscuits Wafers with walnuts and biscuits a phenomenal combination of walnuts with biscuits, another old recipe of our grandmothers. My grandmother knew how to make it every week and make everyone in the house happy. You get a real dessert on the table in a very simple and cheap way. Follow recipe. Ingredients: very easy, total time: 40 min. 5 Wafers crust 500 g granulated sugar 500 ml of milk 250 g of butter/ or margarine 200 g of ground walnuts 500 g of ground biscuits Wafers with Walnuts and Biscuits Preparation: Put sugar, milk in a medium saucepan and mix over a moderately moderate heat and wait for it to boil, when the sugar is nicely combined, add butter or margarine and stir until completely melted. When everything is nicely combined, remove from the heat and add the ground walnuts and ground biscuits and mix the mixture well with a wooden spoon. Allow the filling to cool slightly and while the filling is still lukewarm you can start coating the wafers. When you have finished the layers of wafers, you can put something heavy on the wafers overnight to form them nicely, and you can cut the cake the next day. Buon appetito! NOTE : You can decorate the wafers in various ways with melted chocolate, only one side and then in walnuts, and so the wafer gets a slightly nicer look. Wafers are a simple dessert, but it is very important to follow the recipe and do it properly. In case the filling is thinner, add a little more walnuts and then check the density of the filling. It is not good for the wafer to be a thin filling, then the crust of the wafer absorbs the filling and is not so good. In case the filling is thick, then add a couple of spoons of water or milk. Keep wafers in a dry and cool place. Do you want to try something a little different? Wafers Homemade Grandma's Cakes Grandma Waffles PHOTO SOURCE: https://www.freepik.com/free-photo/chocolate-wafer_1166822.htm#fromView=search&page=1&position=2&uuid=090b2fd9-73cf-42b2-87da-6899a74cc8cc&query=wafers #wafers #with #walnuts #and #biscuits #dessert #biscuit #cake #simple #recipe #delicious #food #dessrtlover #blog #coffeetimelena Use the contact form for questions or advice. I would be happy if you would comment on my recipes and put like.
- Fasting Caramel Wafers
Fasting Caramel Wafers Fasting, and very beautiful, colorful wafers that are made very quickly, will take you only 15 minutes. They look very nice and decorative when cut. Follow recipe. Ingredients: very easy, total time: 35 min. 100 ml of water 6 Tbsp granulated sugar 200 g margarine/ or butter 100 g of white lean chocolate 200 g of lean biscuits 3 Tbsp jam 1 Tbsp cocoa powder 100 g of ground walnuts 4 sheets of wafer Fasting Caramel Wafers Preparation: Caramelize the sugar over a low heat, add 100 ml of water and wait for the sugar to dissolve. Then add the margarine cut into cubes, stir constantly and add the white lean chocolate. When the chocolate has melted, remove from the heat and add the ground biscuits. Separate 3 full, large spoons from the obtained mixture, then add jam, cocoa and ground walnuts to that mixture and stir. Slightly shorten each wafer sheet on the side. Fill the wafers. Take one sheet and coat it with half of the light filling on the side where the cubes are, and cover with another sheet. Do the same with the other two wafer sheets. Mix the separated filling with jam, cocoa and walnuts and coat with a smooth small wafer that we greased, then cover with another part of the filled wafer. Wrap the wafer in transparent foil, place it on a tray and load it with a heavy object. Leave in the cold overnight. Cut with a sharp knife into equal bars. Buon appetito! NOTE: Keep wafers in a dry and cool place. Do you want to try something a little different? Wafers Homemade Grandma's Cakes Grandma's Cakes Grandma Waffles PHOTO SOURCE: https://www.freepik.com/free-photo/many-cookies-are-placed-fabric-then-placed-wooden-table_6172072.htm#fromView=search&page=4&position=12&uuid=b542ef8b-48ef-443f-bcd0-4b43e21d6891&query=caramel+wafers #wafers #lean #biscuits #walnuts #caramel #dessert #fasting #cake #jam #fast #quick #food #foodblog #foodie #blog #foodblogger #foodblog #coffeetimelena Use the contact form for questions or advice. I would be happy if you would comment on my recipes and put like.
- Raffaello Wafer
Raffaello Wafer If you like Raffaello balls, you will surely love Raffaello wafers. It is easy to prepare and does not require much time. Follow recipe. Ingredients: very easy, total time: 1h 10 eggs 20 Tbsp sugar 4 Tbsp soft flour 200 g of coconut 200 g of milk powder 125 g butter 3 sheets of wafer crust Glaze: 150 g of white milk chocolate Raffaello Wafer Preparation: Turn the oven to 200 °C. Beat 5 egg whites with 5 tablespoons of sugar in solid snow, then add 2 tablespoons of flour and 50 g of coconut. Combine all ingredients well, so then coat the first wafer. Bake for 15 minutes at 180°C. Repeat the procedure with the second cover. For the filling, beat 10 egg yolks with 10 tablespoons of sugar in a small pot. Put this pan on the pot in which there is 1.5–2 cm of water, and turn on the hob slightly. When the water in the lower pan boils, cook the egg yolks for about ten minutes. After 10 min. add butter and stir until melted. Remove from the heat, add powdered milk and whisk with a mixer. Immediately add the coconut and whisk everything again. The mixture is thick and sticky. Apply 1/2 of the mixture on the first cover. If your filling is too thick and can't be stretched, add a little milk and just whisk. It can happen when the yolks are smaller, or you have been steaming longer, or the butter is less greasy. Put a wafer sheet over the filling layer (clean, without the filling!) Apply the rest of the filling to this cover, stretch and fold with another cover. This time, you turn it upside down, so that the crust is up to the filling and the wafer is up. Put a tray over it and a load of 2 kg in it. Allow to set. Add glaze if desired. You can use white chocolate Melt it in the microwave to thaw. It must be very light because white chocolate burns easily, so thawing is the safest method, a little slower, but it will melt very nicely afterward. Spread over wafer and sprinkle with coconut. Cool and serve. Buon appetito! NOTE: Keep wafers in a dry and cool place. Do you want to try something a little different? Grandma Waffles Grandma's Cakes PHOTO SOURCE: https://www.freepik.com/free-photo/hand-holding-stacked-wafers-with-copy-space_6684157.htm#fromView=search&page=6&position=15&uuid=b542ef8b-48ef-443f-bcd0-4b43e21d6891&query=caramel+wafers #raffaello #wafer #dessert #food #biscuit #simple #recipe #delicious #easy #fast #delicious #blog #coffeetimelena Use the contact form for questions or advice. I would be happy if you would comment on my recipes and put like.
- Puff Pastry of Eggs and Cheese
Puff Pastry of Eggs and Cheese A very simple and easy recipe, and most importantly, it is ready quickly. An ideal meal for breakfast or dinner. Follow recipe. Puff Pastry of Eggs and Cheese Ingredients: simple, total time: 30 min. 6 servings 3 rolls of puff pastry 200 g of fresh cow's cheese/ or Greek feta cheese 1 egg/ scrambled 1/2 tsp dry parsley/ optional 1/2 tsp salt if the cheese is not salty enough sesame to taste to sprinkle cumin to taste for sprinkle 1 egg scrambled for coating Puff Pastry of Eggs and Cheese Preparation: Mix egg, cheese and dried parsley in a uniform mixture, add salt if the cheese is not salty enough, set aside. Take the first roll of puff pastry and place it on baked paper, flatten the dough with a small rolling pin or with palm, mark 3 equal parts with a knife and apply egg mixture cheese filling in the middle. Beat the egg for coating and with the help of a c brush, coat both sides of the puff pastry. Fold the left side of the puff pastry over the filling, cover with 1 tsp filling again, then fold the right side over the dough, make 4–5 cuts as desired, coat with scrambled egg the top of the puff pastry with a brush. Transfer the roll with the baked paper to an oven tray, so that you can place the other 2 rolls. Cut with scissors out the paper pages from the purchase dough. Repeat the same procedure with the rest of the puff pastry. Using a brush, apply the rest of the egg mixture for coating on all sides. Sprinkle with cumin and sesame seeds if desired. Leave to stand for 10 minutes. Bake in a preheated oven at 180 °C for about 25 minutes. Buon appetito! Puff Pastry of Eggs and Cheese NOTE : Store the finished baked pie with cheese covered in a box for up to 2 days, in a fresh place. Puff Pastry of Eggs and Cheese Do you want to try something a little different? Puff Pastry with minced Meat Puff Pastry with Nutella Puff pastry with Minced meat Filling Quick Puff pastry Pie with Cheese Simple Puff Pastry with Jam Hot Dogs in Puff Pastry Fast Puff Pastry with Sesame #food #puffpastry #cheese #egg #delicious #tasty #easy #recipe #homemade #foodblogger Use the contact form for questions or advice. I would be happy if you would comment on my recipes and put like.
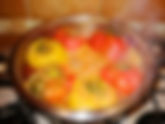
- Stuffed Bell Peppers Lena
Stuffed Bell Peppers Lena There is no one who doesn't like stuffed peppers. A real Serbian traditional dish and everyone adores it, it is made from mixed meat and rice, my aunt's old recipe and I always stick to it, I recommend using lard for the powder if you have it. The taste is fantastic and everyone will like. Follow this delicious recipe. Ingredients: medium, preparation: 30 min, total time:1h 30 min, total time: 2h, 7 persons 1 egg 2 spoons of fat 10 medium bell peppers/ or 7 big 500 g of minced beef and pork 200 g rice 150 ml tomato juice 2–3 teaspoons ground red pepper 3 onions/ finely chopped 3 cloves garlic/ finely chopped 1 tsp salt 1 tsp pepper 1-2 tsp Vegeta/dry spice 1 Tablespoon fresh parsley 1. 5 Tablespoon flour Stuffed Bell Peppers Lena Preparation: Filling for peppers: Take a medium 10 bell peppers, wash it and clean it of stalks and seeds. In one pot, put the fat, fry 3 finely chopped onions, put pepper, and fry 500 gr. of minced beef and pork until all the water comes out. Then put 1 cup of rice 200 gr. and put ground red pepper, 1 clove garlic chopped, parsley leaves and mix everything well. When the mixture is ready, turn off the heat and put an egg and mix well with a spoon and set aside. Then filling 10 pieces of bell peppers and put them in a pot to cook until soft. When stuffing peppers, you can decorate them, where there was a stalk, with tomatoes or potatoes as you wish. I usually always use stuffed peppers, bacon that I cut into cubes, and dry ribs because it gives a very good taste to the dish. Be sure that when you pour water, the water is 2-3 cm lower than the peppers, because you need also a place for the sauce. Put in a pot also little peppers and dry spice for your taste. After 1 hour make the sauce in a special pan, put a little oil or fat. (I use fat, because, it is healthier) when the fat heats up, put half a spoonful of flour, add 2 cloves of garlic and stir it quickly until it turns yellow-brown. Work over medium heat add ground red sweet peppers and pour tomato sauce and mix it well for about 10 minutes. When it is ready, pour over the peppers with the sauce and finally add a little water and let it simmer over low heat, and cover it. Cooking is about 1h and 30 min. You can add a little parsley when is done. Buon appetito! NOTE: My peppers are huge, so one-half of my peppers are for one serving :) Stuffed peppers are very delicious, so you will enjoy them while eating them. This is a family recipe. Keep the rest of the food covered in the refrigerator for up to 3 days. Stuffed Bell Peppers Lena #serbianfood #maindishes #recipe #stuffed #bellpeppers #stuffedpeppers #mincedmeat #peppers #recipe #coffeetimelena #maindish #pepppers #cooking #foodblog #foodie #foodblogger #coffeetimelena #blog Use the contact form for questions or advice. I would be happy if you would comment on my recipes and put like.
- Roasted Stuffed Bell Peppers in the Oven
Roasted Stuffed Bell Peppers in the Oven Beautiful and delicious Serbian traditional dish of stuffed peppers in the oven, our favorite dish number 1. Whoever of the foreigners tries this dish, there is no chance that he did not ask me for the recipe. It is prepared in the following way, for this dish you will need peppers, minced beef, rice and other vegetables in the description. You must try this and do not miss the fantastic taste. Follow recipe. Ingredients: refractory bowl 35×25 cm, medium, total time: 2 hours, 4 serving 10 medium-sized yellow or red bell peppers/ cleaned of seeds inside 300 g ground beef 1 cup rice/ 80 g 1 carrot/ finely chopped 1 head of red onion/ finely chopped 3 cloves garlic/ finely chopped 1 teaspoon ground red sweet pepper 10 pieces of cherry tomatoes/ cut on half 1 teaspoon salt black pepper to taste 1 egg 1 Tbsp fresh primrose, finely chopped Spray: 3 Tablespoons oil 2 Tablespoons of flour 2 teaspoon red sweet pepper 2 full Tablespoon tomato purée 450 ml of water pinch of salt 1/2 Tsp of sugar Roasted Stuffed Bell Peppers in the Oven Preparation: Prepare all the ingredients as described above. Put a little oil in the pan and heat over a moderate heat. Put chopped red onion and fry for 2 minutes. Add finely chopped carrot and fry for about 2–3 minutes. Then add minced meat, rice, red ground pepper, salt, pepper, and garlic cloves finely chopped. Mix all the ingredients well and cover the pan. Cook for about 10–12 minutes, until water comes out of the meat. Finally, turn off the heat, add 1 egg and stir quickly With this filling, you will fill the peppers, leaving space for closing with cherry tomatoes. Cut the cherry tomatoes in half and close the stuffed peppers. Oil the refractory dish well and roll each pepper in oil. If you have some filling left, pour the filling between the peppers. Arrange the peppers side by side. Cover the peppers with aluminum foil and place in a preheated oven at 200 degrees to bake. Bake the peppers for a total of about 1 hour and 30 minutes. While roasting the peppers, after 35 min. turn to the other side and cover. After 45 minutes of baking, start making the spray. Spray: Pour oil into one deep smaller pot and wait for it to heat up, then add flour, stir constantly. When the flour turns yellowish brown, add 1 tsp of red ground pepper, stir quickly, add 2 Tbsp of tomato purée, pinch of salt, 400 ml of water and sugar. Stir until the mixture well combined into a compact mixture. Pour this mixture over the peppers, and continue to roast the peppers. 10–15 minutes before the end, remove the aluminum foil, and bake until done. When the peppers are roasted and the juice gained in density, remove from the oven and sprinkle over the peppers with a fresh chopped parsley. Buon appetito! NOTE : Keep the rest of the food covered in the refrigerator for up to 3 days. #food #maindishes #stuffed #bellpepers #oven #delicious #serbianfood #mincedmeat #recipe #tasty Use the contact form for questions or advice. I would be happy if you would comment on my recipes and put like.
- Stuffed Peppers with Vegetables
Stuffed Peppers with Vegetables Wonderful lean peppers, ideal for fasting or for vegans. A summer version of stuffed peppers with vegetables that is very tasty and healthy! In this recipe, I added some pork meat that I had left in the freezer, so I used it for this occasion, but you don't have to, because these stuffed peppers are lean and only stuffed with vegetables. Quick to prepare and quick to finish. Follow recipe. Ingredients: simple, total time: 60 min. 6 serving 2 medium heads of onion/ finely chopped Olive oil 12 bell peppers/ cleaned 2 zucchini/ coarsely grated 1 potato/ coarsely grated 130 ml water 3 carrots/ coarsely grated 1/2 teaspoon pepper or to taste 2 garlic cloves/ minced 50 g of rice pinch of salt 2 teaspoon dry spice Vageta 5–6 medium tomatoes/ diced 2 teaspoons ground red pepper 1 teaspoon dry parsley/ or fresh Stuffed Peppers with Vegetables Preparation: Prepare all the ingredients as described above. Coarsely grate carrots, potato, and zucchini. When you have finished, finely chop onions. Fry the onion in a little oil until transparent, then add the grated vegetables. Stir and add a little water to prevent burning. Cook over moderate heat, covered and stirring occasionally. When the vegetables have softened, add the rice and spices (dry spice Vegeta, pepper, red ground paprika, and garlic), stir everything well, cook for the next 2 minutes, then turn off the heat. Fill peppers with vegetable filling, arrange in a metal baking dish. You don't need to add oil because that's where the water will go. Cover the stuffed peppers with a tomato slice, cut the rest of the tomatoes into smaller slices and arrange them between the rows of peppers. You can add some pork meat or ribs in between, as I did, which I have left in the frieze. It's for those who can't quite live without meat. :) Mix the remaining vegetables from the filling with water add to the bowl, so that it is 1–2 fingers lower than the peppers. The liquid must not pour over the peppers and tomatoes. Turn on the oven to 180 °C. Cook first on the stove. From the moment of boiling, cook for another 20 minutes. If necessary, add a little salt and pepper to taste and dry parsley. Then transfer the container to the oven and bake for another 15–20 minutes in a preheated oven at 180 °C. Ready peppers can be served with sour cream if you want! Serve warm in a plate. Buon appetito! NOTE: Instead of tomatoes to cover the peppers, you can also use medium potatoes that you will cut into rings. If I had smoked bacon, I would have put it next to the peppers so that it smells better and tastes better. If you have it at home, do it because it will be even tastier. The time to use these peppers is up to 4 days in the refrigerator. To make smaller peppers, just half the quantity! #stuffed #peppers #with #vegetables #simple #delicious #vegan #healthy #lean #recipe #maindish #food #holiday #summer #meal #foodie #foodlover #foodblogger #blog #coffeetimelena Use the contact form for questions or advice. I would be happy if you would comment on my recipes and put like.
- Carniola Stuffed Peppers, the best recipe
Carniola Stuffed Peppers, the best recipe A wonderful combination of stuffed peppers with Carniola sausage and rice. You can also use brown rice if you really like it. The Carniola sausage has a specific taste, so it gives this dish a special flavor note. A phenomenal meal that will delight your dear housemates as well as guests. Follow recipe. Ingredients : medium, total time: 115 min. 6 servings Filling for Peppers: 10 medium bell peppers/ cleaned of stems and seeds 2 Tablespoon of oil 1 medium onion/ finely chopped 5 pieces of Carniola sausages- 500 g/ finely chopped or blended 1 cup of rice/ 200 ml 2 cloves of garlic/ finely chopped 1 teaspoon of salt 1 teaspoon of pepper 2 teaspoons of red ground pepper 1 egg fresh parsley leaves/ finely chopped Paprika Sauce: 200 ml of tomato paste 2 cloves of garlic/ finely chopped 2 Tablespoons of flour 3 Tablespoons of oil 1/2 teaspoon of salt 1 Tablespoon fresh parsley/ finely chopped Carniola Stuffed Peppers Preparation : Prepare all the ingredients listed above as described. First prepare filling for the peppers. Fry the onion in a little oil in a deep cook pot, (moderate heat) when it becomes glassy, then immediately add the rice and a little water, simmer for about 10 minutes. Then add the blended Carniola sausages, spices (salt, pepper, and ground red pepper) mix it well. If necessary, add a little more water. When the rice has softened a little, turn off the heat, add 1 egg and mix well, followed by chopped parsley. The filling is then ready for filling. Fill the peppers cleaned from the stems and seeds with the filling using a small spoon. Fill to the top and close the peppers with the stem or with a slice of tomato or a potato ring, and arrange them in the pot. Add water to the peppers (1/3 of the pot), the peppers must be halfway in the water. Cook on moderate heat for about 1 hour. After spinning for 45 minutes, prepare the sauce for the peppers. Pour the oil into a small pan, wait for it to heat up well on a slightly moderate heat. After that, add the flour, quickly mix it in, then add the garlic, until it releases its smell, immediately add the tomato paste, mix until you get a slightly thick mixture, add salt and pepper to taste. Cook this mixture for about 10 minutes. When the sauce is ready, turn off the heat and add the parsley and stir. Add this spray to the pot with the peppers and spread well. Cook for another 40 minutes. Serve warm in deep plates. You can combine peppers with topping sour cream. Buon appetito! NOTE: You can also bake them in the oven, then you will turn on the oven at 180 °C. Bake for about 40 minutes with the addition of sauce, with occasional pouring sauce and adding a little water as needed. Do not open the oven before 25 minutes! You can combine fried zucchini or boiled potatoes with these stuffed peppers, with a topping of sour cream. #Carniola #Stuffed #Peppers #food #maindish #stuffed #peppers #sausages #rice #tomato #paste #sauce #delicious #recipe #serbian #foodlover #blog #coffeetimelena Use the contact form for questions or advice. I would be happy if you would comment on my recipes and put like.
- Health & Alternative Medicine
Health & Alternative Medicine Regular physical activity is an important factor in the prevention of coronary heart disease and for optimal body weight, delay, and prevention of the occurrence of some risk factors for the development of coronary heart disease. Recent studies have shown that it prevents the development of some cancers. Physically active women are less likely to develop breast and reproductive cancer. The following activities are recommended for the elderly: walking, running, cycling, light gymnastics, and swimming. Each exercise should be preceded by 5 to 10 minutes of warming up by stretching or walking. On this page, I will try to convey to you all the new information about proper exercise and training and maintaining good health that is necessary for all of us. Man has long understood that plants are medicinal, and he has always strived for even greater knowledge, passing that knowledge from generation to generation orally and in writing. From such legends, folk medicine emerged. Health and Alternative medicine #healthandaloternativemedicine #health #alternativemedicine #coffeetimelena #coffeetimewithlena #coffeetimewithlenatrieste Use the contact form for questions or advice. I would be happy if you would comment on my recipes and put like.
- Welcome to My Site, Coffee Time with Lena All in 1
Welcome to My Site, Coffee Time with Lena All in 1 This site is for all ages interested in cooking. Discover new recipes from around the world, along with insights from alternative medicine and science. Join me on daily cooking adventures, inspired by various cuisines. Enjoy “Coffee Time with Lena All in 1” with your morning coffee. Coffee Time with Lena all in 1 Welcome to My Site, Coffee Time with Lena All in 1 RECIPES LENA Lena Recipes I am the voice, author, and creator of “Coffee Time with Lena all in 1.” My name is Helena. I am a native of Serbia, born in Novi Sad, and a graduate of a high economics school. I have extensive experience working in banking and large corporations in my hometown. Likewise, I have a passion for swimming and motorbike riding, and I am an avid animal lover. I once had a Labrador who lived to a ripe old age. Besides dogs and horses, dolphins are among my favorite animals. I am a member of the Dolphin Project organization led by Ric O'Barry, and I encourage you to support these magnificent creatures through small donations. More information is available on their website. You can find the link here and also read more about me . From a young age, I developed a love for cooking and enjoy experimenting with food, embracing new flavors and challenges in the kitchen. My culinary experience was enriched by working on a sailing ship, a job that I instantly fell in love with. It provided me with opportunities to visit numerous destinations, make new connections, and gain diverse experiences, both professionally and culinarily. I have had the chance to try various specialties, which inspired me to innovate while respecting traditional practices. While tastes in food are subjective and unique to each individual, I have accumulated valuable knowledge and experiences that I am eager to share with you. I hope to inspire you to diversify your daily menu. Through this blog, I offer a variety of recipes from almost all regions, particularly from Serbia and Italy, as well as Greece, Turkey, and France. I aim to present these recipes in a straightforward manner for easy understanding. I invite you to join me regularly, as I will be sharing new and delightful recipes each day. Welcome to My Site, Coffee Time with Lena All in 1 Food Tourism plays a vital role in the tourism industry as it is one of the major factors for selecting a tourist destination. As the climatic conditions, history, and culture determines and shapes the food of the area. Today's tourist is better informed, more cultured, well-traveled, and looking for new experiences. Food offers a gateway into other cultures, through taste, through food preparation, and the whole eating environment. Read more . Welcome to My Site, Coffee Time with Lena All in 1 Health and alternative medicine Regular physical activity is an important factor in the prevention of coronary heart disease and for optimal body weight, delay, and prevention of the occurrence of some risk factors for the development of coronary heart disease. Recent studies have shown that it prevents the development of some cancers. Physically active women are less likely to develop breast and reproductive cancer. Read more … ENJOY IT WITH ME EVERY MORNING WITH A CUP OF COFFEE. #food #blog #recipe #foodblogger #coffeetimelena #coffeetimewithlenaallin1 #coffeetimewithlena #health #alternative #medicine #foodblog Use the contact form for questions or advice. I would be happy if you would comment on my recipes and put like.
- Chicken Paprikash in Terracotta
Chicken Paprikash in Terracotta The paprikash in terracotta really gives a different look and taste. Today I decided to make it as simple and tasty as possible, in which I added herbal ingredients and various spices. The paprikash is made in a light way without the addition of flour, and with lots of vegetables and chicken drumsticks. This is ideal to make for Sunday lunch if you don't have much time during the week, try this recipe of mine, I believe you will make it many times. Follow recipe. Chicken Paprikash in Terracotta Ingredients : simple, total time: 2 h 15 min., 6 serving 1 big whole onion/ finely chopped 3 carrots/ cut into rings 1/4 celery root/ finely chopped/150 ml cup full 4 fresh red long pepper/ cut into lengthwise strips 2 cm thickness then cut in half 9 pieces drumsticks 3 big tomato/peeled and diced -or 3 medium — diced/ 200 ml cup 5 medium potatoes/ diced 1 tsp dry parsley 2 cloves of garlic/ crushed 4 tsp tomato paste 1 teaspoon salt 1/2 tsp black pepper/ or to taste 2 tsp dry spice/ Vegeta 2 tsp red ground pepper 1 tsp smoked paprika 1/2 tsp red-hot crushed pepper 4 Tbsp vegetable oil 1 bay leaf water as needed Tools : Deep bowl terracotta 5-6 liter + lid or aluminum foil Wok pan Chicken Paprikash in Terracotta Preparation: Prepare all the ingredients as described above. Wash and clean all the vegetables well, cut them according to the description. Wash the chicken drumsticks and remove the lower part of the cartilage with a sharp knife. If you want, you can remove the skin from the chicken drumsticks. I removed the skin from 5 pieces, and left the skin on 4. I did this because my husband likes to eat drumsticks with the skin on, and at the same time, the skin gives this dish a better taste! Coat the terracotta with oil, all sides, with help of a brush. Sauté the onion in 4 tablespoons of oil for 2 minutes, then add chopped celery, carrot, and sauté and stir for 5 minutes. After that, add sliced peppers, diced tomato, bay leaf and 2 crushed garlic cloves. Simmer for 20 minutes on moderate heat, with stirring occasionally. Turn off heat. Pour all sautéed vegetables in terracotta, add the diced potatoes, drumsticks, all the spices according to the description, add enough water to be 1 finger level below all the ingredients. At the end, add tomato paste with a little water and stir once more. Swirl the bowl once more. Now heat the oven to 220 °C. Cover the terracotta dish. Ten minutes after transfer terracotta dish in the heated oven. Reduce heat to 180 °C. If you don't have a terracotta lid, you can use aluminum foil. Cook for about 2 hours. Add water as needed during cooking after 1 hour and remove the lid. (If you want a thicker meal, add a little water 2 times per 150 ml during the entire cooking process. If you want less thick, add 250 ml water twice.) I added 2 each of 150 ml of water if I like it thicker. Serve warm in deep plates. Buon appetito! NOTE : In terracotta dish, you can also use a whole chicken divided into 4 parts, or some other parts of chicken meat. If you like the recipe this way, you can use diced veal instead of chicken, add more than one bay leaf and add some thyme and marjoram. I used fresh long peppers: 2 red, 2 green and 1 yellow. If you like pasta, you can add dumplings, see the recipe here how to make them. Cook them in a pot with a little salted water, then pour the stew over them. For this method, you need more water in the terracotta. I did not add flour to this stew, and the dish is easy to eat. And if you really like to add it, add 1 tablespoon mixed with a little water and mix with the ingredients before baking. Do not add any more spices because the stew is just right. If you want it hotter, add 1 teaspoon of red-hot pepper flakes. Pour the rest of the food into another pot and keep in the refrigerator for up to 3 days. #chicken #paprikash #in #terracota #simple #delicious #recipe #food #maindish #lunch #Sunday #holiday #healthy #serbian #meat #vegetables #foodie #foodlover #blog #coffeetimelena #coffeetimewithlena Use the contact form for questions or advice. I would be happy if you would comment on my recipes and put like.
- Paprikash Lena
Paprikash Lena Paprikash that you will often make, enriched and very tasty according to my recipe. Everyone in the family is crazy about it! It's not because it is my recipe, it is really delicious, rich of vitamins and ingredients give a very good taste. Try it, you will need time about 1 h 40 min. Follow recipe. Ingredients: medium, total time: 1h 40 min, 6 servings 2 kg of chicken/ drumsticks and thigh 3 onions/ finely chopped 2 carrots/chopped into rings 1 parsnip/ chopped into rings 1 fresh red pepper/ diced 1/4 celery root/finely chopped stalks of 1 celery/ finely chopped 3–4 potatoes medium/ diced celery leaf/ finely chopped 2 teaspoons salt (to taste) 1 teaspoon pepper 4 teaspoons sweet ground red pepper 1/2 teaspoon ground hot pepper to taste 1 Tablespoon fat 1 deep pot water as needed Paprikash Lena Preparation : Finely chop the onion and fry it in fat. Fry it over low heat, being careful not to burn it, stirring occasionally, and reducing the heat. When the onion softens and turns yellow, add the drumsticks and other meat. Add salt and pepper, chopped carrot, celery stalk, paprika, and parsnip. After 15 minutes, add the ground paprika and enough water to cover the flesh of two fingers to be above (2 cm). It is better to pour a little more water at the beginning, it will certainly evaporate, than to burn your meat. To prevent the meat from falling apart, it is best to cook with more water, covered over low heat without stirring. Cook for about 1 hour. If you see that the paprika is very hot, make sure that the liquid does not evaporate completely and that the paprika does not burn, add water if necessary. Peel potatoes, grate it and cut it into cubes. Put the potatoes in the stew 30 minutes before the end. The amount of liquid also depends on whether you like to eat the paprika with a spoon or a fork. Depending on your taste, you can also make a steeper stew, and immediately cook noodles or dumplings in it. I personally cook with homemade dumplings. For these dumplings, you need to beat: Stir well 1 egg, little salt, pepper, and flour so that the dough is not too hard. The dough must be more to be gooey. Then take out the molds with a wet fork, insert and wait for about 5 minutes before the end of the stew. In that case, take care the stew does not stand for long so that the dough does not absorb all the soft. And when you have turned off the hob, add the parsley and celery leaves. Serve warm. That variant makes sense if you know you’re going to spend it all right away. Buon appetito! NOTE: Serve cooked stew with cooked pasta, potatoes, or side dish as desired. You can also use chicken wings with drumsticks, or just small drumsticks, as you prefer. #food #paprikas #homemeade #serbian #meal #stew #chicken #meat #potatoes #vegetables #recipe #foodlover #foodblog #foodblog #blog #coffeetimelena #foodblogger Use the contact form for questions or advice. I would be happy if you would comment on my recipes and put like.
- What is Cicvara and How is it Prepared?
What is cicvara and how is it prepared? Cicvara is a healthy and old traditional dish in the Serbian household, but unfortunately very forgotten and neglected. Good cicvara can be found in old Serbian restaurants and local cuisine in Montenegro-mountainous areas as well as in Serbia Zlatibor, Tara, Soko Banja and Durmitor. If you have the urge to make this old-fashioned dish, here is one of the recipes for how to make it. If you want to try your own culinary skills, here is a recipe. What is cicvara and how is it prepared? Ingredients : simple , total time : 15 min . 100 g corn flour 200 g cream or cheese (cow) 300 ml milk 200 ml sour cream 1 Tablespoon grease salt to taste Preparation : Put the milk in a deep bowl to warm it up. During this time, mash the cheese, add fat, add sour cream, mix. Season if the cheese is not salty. When the mixture boils, slowly, with constant stirring, add the mixture of cream cheese, cheese, and fat to the milk. Mix all the ingredients well, then when the first key starts, add the corn flour. Stir until the mixture thickens. Remove from heat. Serve chilled with sour milk or yogurt. 2. Recipe Cicvara Ingredients : simple , total time : 15 min . 200 ml of water 1/2 teaspoon salt (if cheese or cream is salty, reduce the amount) 1 teaspoon butter or fat 100 g of old ripe cream 100 g of old cheese 4 Tablespoons corn flour Preparation : Put water, butter, and salt on the stove to boil. Then, add cream and cheese and cook, stirring, to melt both. Then add the corn flour and cook at a lower temperature with constant stirring until the cicvara starts to separate from the pan and then cook for a few more minutes, also with constant stirring. 3 . Recipe Cicvara Ingredients : simple, total time: 15 min. 200 ml milk 200 ml of water 1 spoon of fat 8 Tablespoons corn flour 500 g of cheese a little cream teaspoon of salt Preparation : Bring water, milk, and a tablespoon of fat to a boil. Add the shredded cheese, add salt as needed. Slowly pour corn flour into the boiling liquid, stirring constantly. Add a salt if the cheese is not salty. Cook for 10 minutes on low heat, stirring constantly. Finally, add the cream and serve while hot. Buon appetito! Do you want to try something a little different? Homemade Cicvara old recipe #food #maindish #old #recipe #cicvara #serbian #meal #delicious #recipe #foodie #riipe #cream #cheese #cow #sour #cream #water #corn #flour #salt #foodblogger #foodie #foodstagram #blog #coffeetimelena Use the contact form for questions or advice. I would be happy if you would comment on my recipes and put like.
- Cream of Chicken and Bacon for the Pasta Topping
Cream of Chicken and Bacon for the Dough Topping A creamy dressing that is ready in just a few minutes. I prepare it in a more Mediterranean way and believe me it is very tasty, you will be asking for more. You don't need salt because the bacon is salty enough and the purchased chicken is already seasoned and half cooked. I buy AIA packs here, and you can use another pack. The meal is quick and ready fast. Follow the recipe, it is very easy. Ingredients : simple, total time: 30 min, 2 servings 240 g any pasta 200 ml of cooking cream 300 g chicken stripes purchased 1/2 onion /finely chopped 15 g of butter 1 teaspoon of oregano 3 cloves of garlic/ finely chopped 1/2 teaspoon pepper 100 g of diced smoked bacon 150 ml of boiled pasta water 3 Tablespoons of grated Parmesan 2 pinches of dry parsley Cream of Chicken and Bacon for the Pasta Topping Preparation : Prepare all the ingredients as described above. First, attach a deep pasta pot and add 1 tablespoon of sea salt. When the water started to boil, add the dough and cook according to the instructions, I always cook Italian alla dente. It means that the dough should be a little harder without being too soft. Save the water in which the pasta was cooked, take out about 12 spoons of that water, and put it aside. Fry the bacon in a deep-frying pan in very little oil (1 spoon), when it has become transparent, remove it from the frying pan. Put the chopped onion in the same pan with the butter and fry for about 5 minutes until it softens and turns yellowish. Then add the chicken stripes and fry for about 10 minutes, stirring occasionally. Add fried and diced bacon, garlic, oregano, pepper, and stir for about a minute. Immediately after that, add the cooking cream and stir, cook for about 3 minutes. After that, add 150 ml of water in which the pasta was cooked and stir. In the last 2 minutes, add grated Parmesan and parsley, cook for about 2 – 3 minutes and turn off the heat. Pour this cream over your pasta, it can be (macaroni, spaghetti fettuccine, rigatoni, penne). You can put the pasta in the pan and mix everything together, do this before adding the Parmesan and water. Enjoy the bites. It is very delicious!!! Buon appetito! Cream of Chicken and Bacon for the Pasta Topping #cream #of #chicken #and #bacon #for #the #pasta #topping #food #maindishes #maindish #sauce #creamy #cream #Parmesan #delicous #Mediterranean #simple #recipe #fast #blog #coffeetimelena #foodie #foodblog #foodblogger #foodlover #italian #italianfood Use the contact form for questions or advice. I would be happy if you would comment on my recipes and put like.
- Creamy Gnocchi with Salmon
Creamy Gnocchi with Salmon An Italian meal of gnocchi in a creamy sauce with salmon that is ready in just 20 minutes. This quick, economical and simple recipe is suitable for those who are always on a time crunch. The taste is fantastic, you must try it! Follow recipe. Creamy Gnocchi with Salmon Ingredients : simple, total time: 20 minutes, 2 serving 250 g of potato gnocchi/ 1 pack 200 g of smoked salmon/ chopped 1 big clove of garlic/ minced 200 ml of fresh liquid cream 1 Tbsp grated Parmesan cheese 1 sprig of parsley/ finely chopped 2 Tbsp olive oil EVO pinch of salt black pepper to taste Creamy Gnocchi with Salmon Preparation : Cut the salmon fillets into smaller pieces. Finely chop garlic and parsley leaves. For Gnocchi : Prepare a medium pot of water add a teaspoon of salt, wait for it to boil on moderate heat. When the water boils, add the gnocchi and cook for about 2–3 minutes. As soon as they float to the surface, remove them with a slotted spoon and place in a colander to drain well. Cooking the gnocchi and making the sauce must be done at the same time, because they will be ready quickly! Creamy Sauce with Salmon : While the water is heating for the gnocchi, pour olive oil into a pan and heat over medium-low heat. Add chopped salmon fry about 3–4 minutes then add minced clove of garlic, fry for a few seconds. As soon as the garlic releases its aroma, add the cooking cream, stir for about a minute. Season to taste, continue to cook for about 5 minutes on low moderate heat. In the last minute, add a spoon of grated Parmesan and the well drained gnocchi, mix well and turn off the heat. Sprinkle with chopped parsley. Serve warm with grated Parmesan cheese as desired. Buon appetito! NOTE : If you don't have cooked cream, you can substitute Philadelphia cream cheese and a little milk, which you will mix beforehand to get the structure of cooked cream. You can also replace it with béchamel sauce. For that, you will need milk, butter, and flour. For that recipe, see here. #creamy #gnocchi #with #salmon #foodporn #foodie #foodstagram #food #simple #recipe #easycooking #fish #sauce #Alfredosauce #cream #blog #recipes #meal #lunch #dinner #foodblogger #coffeetimewithlenaallin1 #coffeetimelena Use the contact form for questions or advice. I would be happy if you would comment on my recipes and put like.
- Creamy Salmon with Tagliatelle and Leeks
Creamy Salmon with Tagliatelle and Leeks Delicious Mediterranean dish, light and healthy. Preparation is simple and ready for 30 minutes. The vitamins we need during the summer are right here! Follow the recipe. Ingredients: simple, total time: 35 min, 2 servings 220 g tagliatelle/ boiled alla dente 100 g of salmon sheets/ diced 200 ml of cooking cream 1/4 stalk of leek/ finely chopped 2 garlic cloves/ minced sea salt and black pepper to taste 1 teaspoon of dry parsley 1 Tablespoon of olive oil/ or butter 2 Tablespoon grated Parmesan cheese Preparation: Prepare all the ingredients as described above. Add the pasta water. Add 1 teaspoon of sea salt. Wait for it to boil, cook the pasta according to the instructions. Save 2 Tablespoons of that liquid, then strain them. You will need that liquid for later. When you make this dish, make sure you make the pasta and the salmon cream at the same time! Fry the leek for a few minutes in olive oil, add the chopped garlic, stir and cook until the garlic releases its fragrance. Add diced salmon, season (with salt and pepper) to taste, stir-fry for about 4 minutes. Immediately add the cooking cream. Stir add spices to taste (with salt and pepper) and add the parsley. Cook for 5–7 minutes. At the very end, add 1 Tablespoon liquid where tagliatelle was cooked, grated Parmesan cheese, stir for about a minute. Immediately after that, add the cooked tagliatelle, stir and turn off the heat. Serve immediately on shallow plates and sprinkle with dry parsley. Buon appetito! #creamy #salmon #with #tagliatele #and #leeks #cream #mediteranean #recipe #food #meal #dinner #lunch #pasta #italian #recipe #holiday #Alfredosauce #sunday #healthy #delicious #easy #foodie #seafood #fish #foodblogger #blog #coffeetimelena Use the contact form for questions or advice. I would be happy if you would comment on my recipes and put like.