

Coconut Roll Lena

Updated: Oct 22
I take great pleasure in preparing the chocolate coconut roll, as it fondly reminds me of Bounty chocolates. The combination of rich chocolate and sweet, chewy coconut evokes a sense of nostalgia, transporting me back to moments of indulgence and joy. This delightful treat not only satisfies my sweet tooth but also allows me to share a piece of my fond memories with others.
Here, I will share my method for creating this delightful and flavorful coconut roll, which has become a favorite among my family and friends. The process is not only enjoyable but also quite simple, making it an ideal recipe for both novice bakers and seasoned cooks. The best part is that it is quick to prepare, allowing you to whip up this delicious dessert in no time, perfect for unexpected guests or a cozy family gathering.
Ingredients
To begin, gather the following ingredients:
- 200 grams of desiccated coconut
- 150 grams of sweetened condensed milk
- 100 grams of dark chocolate (or milk chocolate, depending on your preference)
- A pinch of salt
- Optional: a splash of vanilla extract for added flavor
Preparation Steps
1. Mixing the Coconut Base
In a large mixing bowl, combine the desiccated coconut and sweetened condensed milk. Stir the mixture until the coconut is fully coated and the ingredients are well integrated. The sweetened condensed milk acts as a binding agent, giving the roll its delightful texture and sweetness. If you choose to add a splash of vanilla extract, now is the time to incorporate it for an extra layer of flavor.
2. Forming the Roll
Once your mixture is ready, transfer it onto a sheet of parchment paper. Using your hands, shape the coconut mixture into a log or roll, ensuring it is compact and uniform in thickness. The size of the roll can vary according to your preference, but a diameter of about 5-7 centimeters is generally ideal for a balanced chocolate-to-coconut ratio.
3. Chilling the Roll
After shaping the roll, carefully wrap it in the parchment paper and place it in the refrigerator. Allow it to chill for at least 30 minutes. This step is crucial, as it helps the roll firm up, making it easier to coat with chocolate later on.
4. Melting the Chocolate
While the coconut roll is chilling, you can prepare the chocolate coating. Break the dark chocolate into small pieces and place them in a microwave-safe bowl. Heat the chocolate in short bursts of 20 seconds in the microwave, stirring in between until it is completely melted and smooth. Alternatively, you can melt the chocolate using a double boiler on the stovetop for a more controlled melting process.
5. Coating the Roll
Once the coconut roll has chilled and firmed up, remove it from the refrigerator. Carefully unwrap it from the parchment paper and place it on a wire rack set over a baking sheet. Pour the melted chocolate over the roll, ensuring it is evenly coated on all sides. Allow any excess chocolate to drip off, creating a smooth, glossy finish.
6. Setting the Chocolate
After coating the roll, place it back in the refrigerator for an additional 20-30 minutes to let the chocolate set completely. This step is essential for achieving that perfect, crisp chocolate shell that complements the soft coconut center.
7. Slicing and Serving
Once the chocolate has hardened, take the roll out of the refrigerator and slice it into thick rounds or bite-sized pieces. Each slice reveals the beautiful contrast between the dark chocolate exterior and the luscious coconut filling. Serve the chocolate coconut roll as a delightful dessert or a sweet snack with a cup of tea or coffee.
Conclusion
This chocolate coconut roll is not only quick and straightforward to make, but it also brings a touch of joy and indulgence to any occasion. I hope you enjoy preparing and sharing this delightful treat as much as I do. Please follow the recipe below, and feel free to experiment with variations, such as adding nuts or dried fruits to the coconut mixture for an extra twist. Enjoy your culinary adventure!
Ingredients: simple, total time: 40 min.
Cake crust:
400 g ground biscuits
4 Tablespoons sugar
200 ml of milk
3 Tablespoons cocoa
Fill:
200 g coconut flour
100 ml of milk
150 g powdered sugar
1 vanilla sugar/ from 1 Tablespoon
250 g of margarine
Glaze:
50 g of cooking chocolate
50 g margarine
1 Tablespoon oil
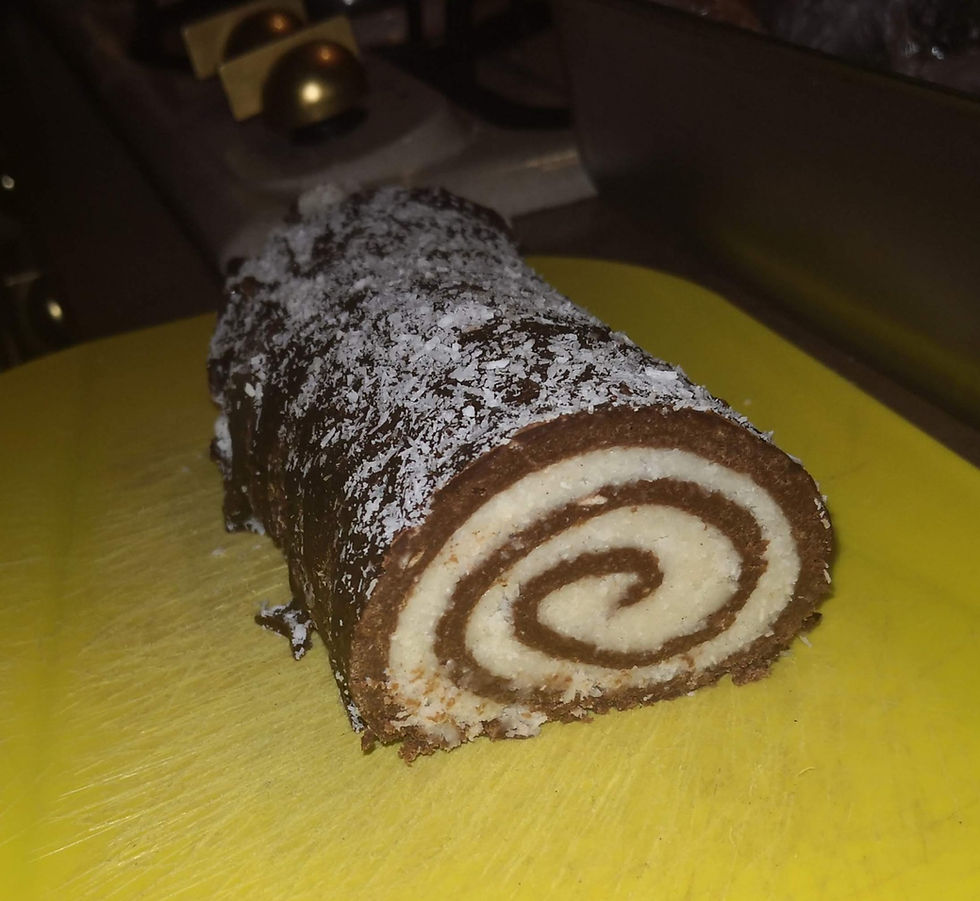
Preparation:
Cake Crust:
Boil the milk, sugar, and cocoa, and cool a bit. Pour over the biscuits and knead the dough from the mixture. Roll out a thin crust over the transparent foil and coat with the filling.
Filling:
Whisk the margarine with powdered sugar and vanilla sugar, gradually adding milk and coconut. Mix everything. Fill the crust, then roll with foil.
Glaze:
Heat the chocolate, margarine, and oil; mix everything and pour over the roll.
Sprinkle from above with a little coconut.
_________________________________________________________
2. RECIPE COCONUT ROLL
Coconut roll is very thin and quick to make if you have that material; here's an idea if you have unexpected guests. Follow the recipe.
2. Recipe Coconut roll
Ingredients: simple, total time: 40 min.
200 g of coconut flour
250 g of powdered sugar
1 Tablespoon cocoa
100 g of chocolate
150 g fasting biscuits
250 g fasting margarine
1 bag vanilla sugar/ 10 g
Preparation:
Finely grind the biscuits and gently soften the margarine.
Using a mixer, cream the margarine, gradually incorporating the powdered sugar and vanilla sugar. Add the coconut and thoroughly combine by hand.
Incorporate the melted chocolate and half of the coconut mixture into the ground biscuits, mixing thoroughly by hand.
Spread the dark mixture onto foil, smooth it out, and layer the coconut mixture on top. Roll it up and allow it to cool completely before slicing. Optionally, sprinkle the remaining coconut over the roll.
Buon appetito!
NOTE:
Keep the roll in a cool place or in the refrigerator for up to 7 days.
#food #dessert #coconut #chocolate #roll #simple #delicious #recipe #blog #foodblogger #coffeetimelena
Use the contact form for questions or advice.
I would be happy if you would comment on my recipes and give them a like.


Comments